
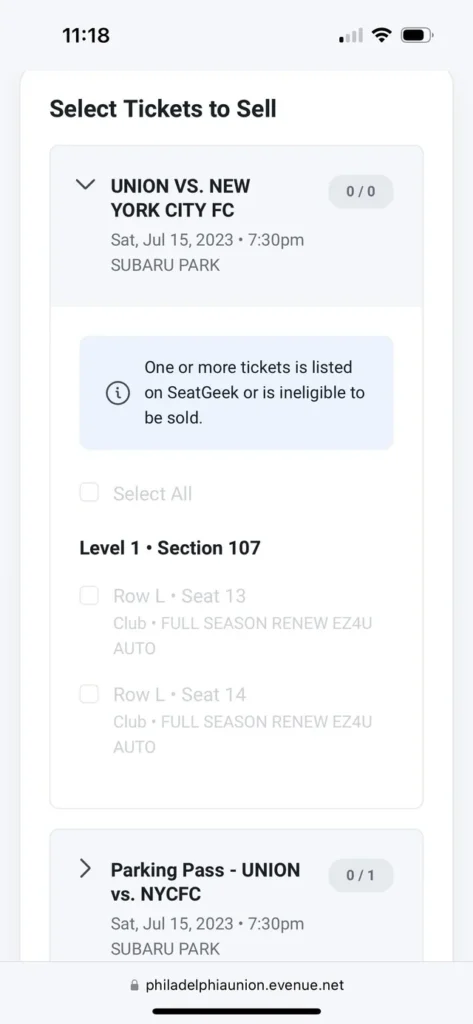
Are you experiencing the frustrating issue of your listing no longer being visible on the SeatGeek marketplace? You’re not alone.
Many users encounter this problem, and it can be quite perplexing.
But fear not, as in this comprehensive guide, we’ll explore the potential reasons behind this issue and provide you with actionable solutions to get your listing back on track.
How To Fix This Listing Is No Longer Visible On SeatGeek Marketplace?
Try to adjust the pricing to complete in the resale marketplace, validate the event day and time, your SeatGeek account, and listing details. Moreover, you may also check SeatGeek policies and contact its support.
Below is a detailed explanation of all the above-mentioned fixes:
1. Adjust Pricing to Compete in the Resale Marketplace
First of all, you need to evaluate the current pricing of similar tickets on the resale marketplace. Consider visiting reputable ticket resale platforms such as StubHub or TickPick to gauge the prevailing prices for comparable tickets to the same event.
If your tickets are priced higher than the prevailing market rates, consider adjusting the listing price on SeatGeek to be more competitive. This can increase the visibility of your listing and attract potential buyers.
Access your SeatGeek account and navigate to the specific listing. Adjust the pricing to align with or undercut the prevailing market rates for similar tickets.
Keep in mind that pricing adjustments may impact the visibility of your listing, especially if there are lower-priced tickets available on other platforms.
Your listing will then appear once it is listed at a lower price compared to the current resale marketplace, or if the other lower-priced tickets have already sold.
If your tickets are not considered “General Admission” and you have adjusted the pricing but are still unable to see your listing, it’s advisable to contact SeatGeek support for further review.
Provide them with details about your pricing adjustments and inquire about any specific requirements or considerations for non-general admission tickets.
2. Verify Event Date and Time
You can double-check the event date and time associated with your listing. If there’s a discrepancy between your listing details and the actual event schedule, it could result in your listing being temporarily hidden.
Ensure that the event date and time in your listing accurately match the official details. For this, follow these steps:
- Access the official event details from the organizer or venue to confirm the accurate date and time.
- Log in to your SeatGeek account and navigate to the specific event listing that is not visible.
- Compare the date and time details in your listing with the official event schedule. If there’s a mismatch, edit your listing to reflect the correct information.
3. Check Your SeatGeek Account
Sometimes, listings may become temporarily invisible due to account-related issues. Look for any notifications or alerts within your account that may provide insights into the visibility status of your listing.
To check your SeatGeek Account, follow these steps:
- Log in to your SeatGeek account via the web or mobile app.
- Look for any notifications or messages on the home page that indicate issues with your listing’s visibility.
- Check if there are any outstanding actions required, such as verifying your account information or resolving payment-related issues.
4. Review Listing Details
Take a thorough look at the details of your listing. Ensure that all the relevant information, such as ticket quantity, seat details, and pricing, is accurately entered.
Any discrepancies or incomplete information could impact the visibility of your listing. For this, follow these steps:
- Access your SeatGeek account and locate the specific listing that is not visible.
- Double-check all the details of your listing, including ticket quantity, seat information, and pricing.
- Make any necessary corrections or updates to ensure that the listing information is accurate and complete.
5. Ensure Compliance with SeatGeek Policies
Review SeatGeek’s selling policies to ensure that your listing adheres to their guidelines. Violations of their terms and conditions, such as pricing irregularities or unauthorized ticket sales, can lead to listings being hidden.
By confirming compliance with SeatGeek’s policies, you can eliminate potential reasons for your listing’s invisibility.
- Review SeatGeek’s seller guidelines and policies, paying close attention to pricing, ticket authenticity, and resale restrictions.
- Make any necessary adjustments to your listing to ensure it aligns with SeatGeek’s rules and regulations.
- Pay particular attention to any recent policy updates that may have affected your listing’s visibility.
6. Contact SeatGeek Support
If you’ve gone through the above steps and your listing is still not visible, it’s time to reach out to SeatGeek support.
They can provide personalized assistance and investigate the specific reasons behind the visibility issue.
Phone and instant chat support will be available within 7 days of your event in case any urgent last-minute issues pop up.
By clicking here, you will locate the support or help section of SeatGeek. Explain the issue with your listing’s visibility and provide any relevant details they may require, such as the event name and listing ID.