
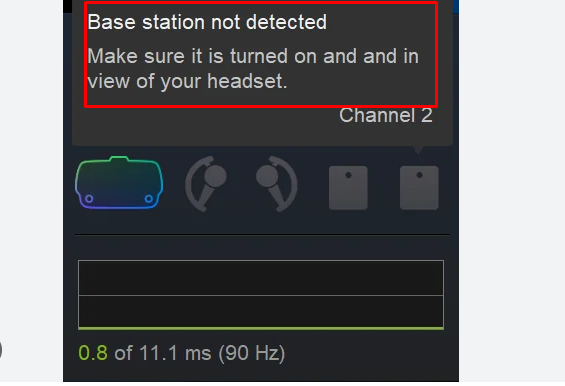
One of the most frustrating problems VR users can encounter is when SteamVR fails to detect their base stations during setup and gets the following error:
The message says “Basestation is not Detected” followed by “Make sure it is turned on and in view of your headset.”
Without the base stations providing positional tracking data, the VR experience is severely limited.
If this has happened to you, don’t worry – you’re not alone, and there are usually simple fixes that can resolve the issue.
In this blog post, I’ll cover the most common reasons why SteamVR may not be detecting base stations and step-by-step solutions to get them working again.
How To Connect Base Stations To SteamVR
To connect base stations to SteamVR and ensure they are tracking correctly, follow these steps:
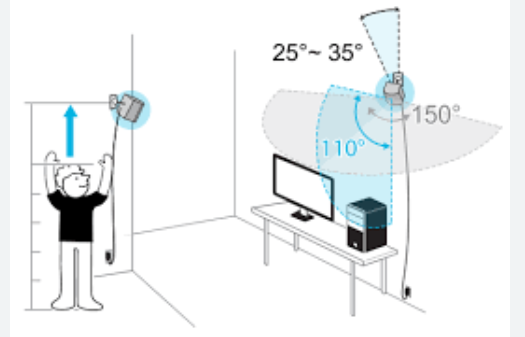
1. Position Your Base Stations
- Base stations come with a protective film covering the part that faces outwards. This film can disrupt the tracking capabilities of the base stations and should be peeled off before you start using them.
- Place the base stations diagonally across from each other in your play area.
- Mount them above head height, ideally around 6.5 feet (2 meters), angled down between 30 to 45 degrees.
2. Secure the Base Stations
- Make sure the base stations are securely mounted to prevent any movement or vibration, which could disrupt tracking.
3. Power Up the Base Stations
- Connect the power cables to the base stations and plug them into power outlets.
- The base stations should automatically turn on, indicated by LED lights (usually green when ready).
4. Set the Channels (for Base Station 1.0):
- If you are using the older 1.0 base stations, set one to channel ‘B’ and the other to channel ‘C’ for optimal communication.
- For the newer 2.0 base stations, channels are managed automatically, and you can use more than two base stations.
5. Launch SteamVR:
- Start “Steam” on your PC.
- Click on the ‘VR‘ icon at the top right of the Steam window to launch SteamVR.
6. Check Base Station Status:
- In the “SteamVR” status window, you should see “green icons” representing each base station if they are detected and tracking properly.
- If the icons are not green, SteamVR may prompt you with instructions to detect the base stations.
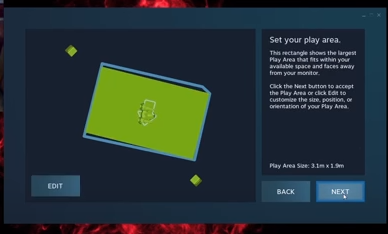
7. Run Room Setup:
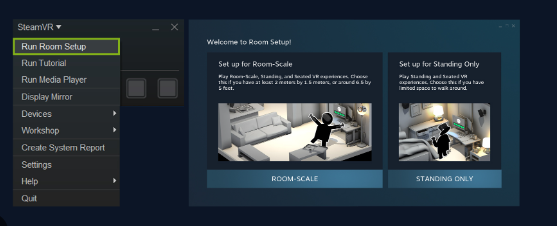
- In the SteamVR application, go to the ‘Run Room Setup’ to calibrate your play area.
- Click on “Room Scale.”
- To set up room space, remove objects and make some free space to setup play areas. Follow the on-screen instructions to complete the room setup process.

- Click “Next” to “Establish tracking.“
- You will see a green indication near the options- Controller and Headser Ready. Click “Next“.

- Click on “Pull and Hold Trigger” to Locate the Monitor. Wait until the bar fills the box and click “Next.“
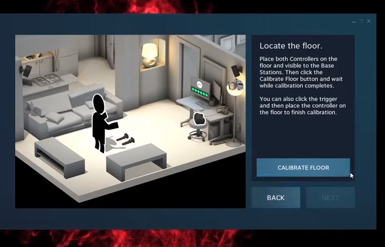
- Click “Calibrate Foor” and Click “Next.” Again Click “Next” in the “Locate Floor screen.“
- Now set up Room Boundry. Click on “Next” to the “Create Some Boundaries” screen and Click “Next“

- Now “Set Play Area” and follow the onscreen instructions to save the settings.
How To Fix SteamVR Not Detecting Base Stations
To fix the SteamVR not detecting base stations issue, first, verify all the connections in place and the power source. Then reduce reflective surface and minimize wireess interferences. If the issue persists, ensure the correct channel planning and factory reset the Base Station.
1. Check The Basics
- First, check that all power cables are firmly connected to your base stations to loose connections.
- Make sure the power to the outlet is active and the LED light is on.
2. Verify The Base Station LED Status Indicators
- A solid green light means that the base station is operating correctly. If you see a blue light, it’s in standby mode.
- A blinking red light suggests a hardware issue.
3. Confirm Base Station Placement
- Base Station They should be mounted at 6.5 feet or higher, angled down between 30 to 45 degrees.
- Avoid placing the base stations on unstable surfaces that could cause them to move or vibrate.
Steps To Troubleshoot The SteamVR Settings
1. Restart SteamVR
Restarting SteamVR can resolve transient issues and is a good initial step. To do this, close SteamVR, wait a few seconds and then relaunch it.
2. Verify SteamVR Tool Integrity
Verifying the integrity of the SteamVR tool checks for corrupted files and automatically repairs missing or corrupted files in your SteamVR installation.
- Open the “Steam” client on your PC.
- Navigate to the ‘‘Library’‘ section.
- Right-click on ‘‘SteamVR” and select ‘‘Properties’‘.
- Go to the ‘‘Local Files’‘ tab and click on ‘‘Verify integrity of tool files’‘. Wait for the process to complete before restarting SteamVR.
3. Check For SteamVR Firmware Update
Lastly, ensure that your base stations are running on the latest firmware. Outdated firmware can often lead to detection issues.
- Start SteamVR.
- If there are updates available, you will see a ‘‘Firmware Update’‘ notification in the status window.
- Follow the prompts to download and install the latest firmware for your base stations.
How To Optimize The USB Connectivity
1. Check The USB Drivers
Make sure your USB drivers are up to date. Outdated or corrupted drivers can cause connectivity issues with your SteamVR base stations.
- Press “Win + X” and select “Device Manager.”
- Expand the “Universal Serial Bus controllers” section.
- Right-click on each USB hub and select “Update driver.”
- Choose “Search automatically for updated driver software” and follow the prompts.
2. Switch The USB Ports
Sometimes a particular USB port can be malfunctioning or not provide enough power for your base stations. Try these steps:
- Unplug and plug USB cables into a different USB port and check the base station.
- Also, Try connecting with different a high-quality USB cable that is in good condition.
- Ensure that the cable is firmly connected and doesn’t show signs of wear or damage.
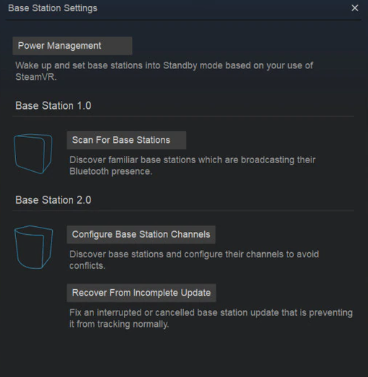
SteamVR’s Base Station Channel Configuration
1. Adjust the Channel Settings
If you’re experiencing issues with your SteamVR base stations not being detected, it’s important to check the channel settings.
- “Turn on your base stations” and launch the SteamVR application.
- Navigate to the ‘‘Devices’‘ menu and select ‘‘Base Station Settings’‘.
- Use the Automatic Configuration tool if available; it can help you set the channels correctly without manual input.
- If automatic configuration is not working or not available, manually change the channel of each base station to ensure they are not on the same frequency. Generally, if using two base stations, they should be set to channels B and C.
2. Ensure Correct Channel Pairing
For those using more than two base stations, or in situations where they may be experiencing interference from other devices, ensuring correct channel pairing is essential:
- SteamVR supports channels 1 through 16 for base stations 2.0, allowing for setups with multiple base stations.
- When using more than two base stations, you must select different channels for each one between B to P.
Resolving Interference Issues
When your SteamVR setup has trouble detecting base stations, interference might be the culprit.
1. Reduce Reflective Surfaces
Reflective surfaces can misdirect IR signals and confuse the tracking sensors. To mitigate this:
- Cover or remove mirrors and large reflective items.
- Close blinds or curtains to reduce sunlight reflection.
- Adjust base station angles to avoid direct reflection paths.
2. Minimize Wireless Interference
Wireless devices operating on similar frequencies can disrupt the communication between base stations and your headset. Take steps to minimize this risk by:
- Turning off “unnecessary wireless devices” in the vicinity.
- Changing your “Wi-Fi channel” to one less congested.
- Keep your “smartphone or tablet” away from the play area.
Advanced Technicians’ Steps
1. Manually Updating Base Station Firmware
- Download the Basetation firmware from the respective manufacturer’s website.
- Use a micro-USB cable to connect your base station to a USB port on your computer.
- With your headset plugged in, start SteamVR to access the necessary tools.
- In your SteamVR window, right-click on the station that is not being detected, and select ‘Customize’ > ‘Update Firmware’.
- Follow the on-screen instructions to upload the firmware to your base stations. Be careful not to interrupt this process as it may cause further issues.
2. Factory Reset of Base Stations
- Disconnect the base stations from the power supply to begin the reset process.
- Find the small reset button on the back of the base station; you might need a paper clip to press it.
- While holding the reset button, plug your base station back in. Keep holding the reset button for about 15 seconds until you hear a beep or see a new light pattern.
- After the new light pattern appears or you hear a beep, release the reset button. Your base station should reset to its factory settings, and you can then attempt to reconnect it within SteamVR.
Seeking Professional Support
If you’ve followed all the previous troubleshooting steps without success, it might be time to seek professional support to resolve the issue with your SteamVR not detecting base stations. Here’s how you should proceed:

- Visit Steam’s Help Page and submit a support ticket.
- You may find the solution within threads on platforms like the Steam Community or Reddit’s r/SteamVR.
- Before contacting support, gather all the necessary information about your system, such as the operating system version, VR headset model, and specifics about the issue at hand.