
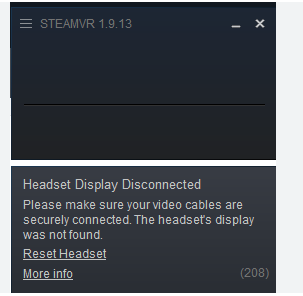
Encountering the error message “Headset Display Disconnected (Error 208)” message in SteamVR can bring your virtual reality journey to an abrupt halt.
This error indicates that SteamVR is having trouble communicating with the display on your VR headset, a critical component for any immersive VR experience.
But fear not! In this blog post, we’ll look into the common culprits behind Error 208 and provide you with a comprehensive guide on how to troubleshoot and fix the problem.
Why Does SteamVR Headset Display Disconnected Error 208 Occur?
The SteamVR Headset Display Disconnected Error 208 occurs when the software is unable to detect the VR headset’s display. This can be due to a variety of reasons, including:
- Cable Issues: A loose or faulty cable connection can prevent the headset from communicating with the PC. This includes HDMI, DisplayPort, USB, or power cables.
- Port Problems: The error can arise if there is an issue with the port on the PC, such as a damaged HDMI or DisplayPort.
- Driver Conflicts: Outdated or corrupted graphics card drivers, or SteamVR drivers, can lead to detection issues.
- Direct Mode Issues: SteamVR operates in Direct Mode by default, which hides the headset from the system as a traditional monitor.
- Software Glitches: Occasionally, a software glitch within SteamVR or other conflicting software can cause the headset to not be recognized.
- VR Headset Hardware Issues: There could be a problem with the headset itself, such as internal hardware failure.
- Graphics Card Compatibility: If the graphics card is not VR-ready or experiencing issues, it may not be able to handle the display output required for VR.
How To Fix SteamVR Headset Display Disconnected Error 208
To Fix The SteamVR headset display disconnected error 208, check the USB cable and USB port for any damages. Then, restart the headset via Steam and reset the headset. If it doesn’t help. reinstall the Steam, remove all USB interfaces other than LAN and reconfigure the headset.
Resetting your headset in SteamVR can often resolve various issues like tracking problems or error messages.
Before getting into the fix, click on the “Reset Headset” option in the error message and follow the on-screen instructions to reset it.
1. Check the USB port
You will get the error if the headset is not properly connected or issue with USB Cable.
- Ensure that the headset is connected tightly to the PS.
- If the error occurs, try connecting the USB to a different port.
- Also, try with a different USB cable if you have one.
2. Restart the Headset via SteamVR

Restarting the headset via SteamVR will fix any issues related to communication and data transfer between the headset and SteamVR
- Open the “SteamVR” application.
- Find the SteamVR status window where you see the icons for the headset, controllers, and base stations.
- Right-click on the headset icon.
- Select ‘‘Reboot Vive Headset’‘ depending on the options available for your specific VR headset model.
3. Power Cycle the Headset
The power cycle will refresh the electronic circuit by removing any minor technical hiccups due to the power supply.
- Turn off the headset by unplugging its power source.
- Wait for about 30 seconds to a minute to let it reset.
- Plug the headset back in to power it on again.
4. Disconnect and Reconnect The USB
Reconnect the USB cable to allow the drivers to reset.
- Unplug the USB cable that connects the headset to the computer or link box.
- Wait a few seconds.
- Reconnect it and you can also check with an alternate port.
- If you previously connected to USB 2.0 (4.8 MB speed) Port try changing to USB 3.0 (up to 4.8 GB speed) and vice versa.
5. Check for Firmware Updates
- Sometimes, resetting issues can be caused by outdated firmware.
- With SteamVR running, if there are any firmware updates available, you will typically see a prompt in the SteamVR status window.
- Follow the on-screen instructions to update the firmware if necessary.
- Once the headset is powered on and recognized by SteamVR, you may need to rerun the Room Setup to recalibrate your play area.
- Access Room Setup through the SteamVR menu and follow the instructions provided.
6. Reset The SteamVR USB Devices
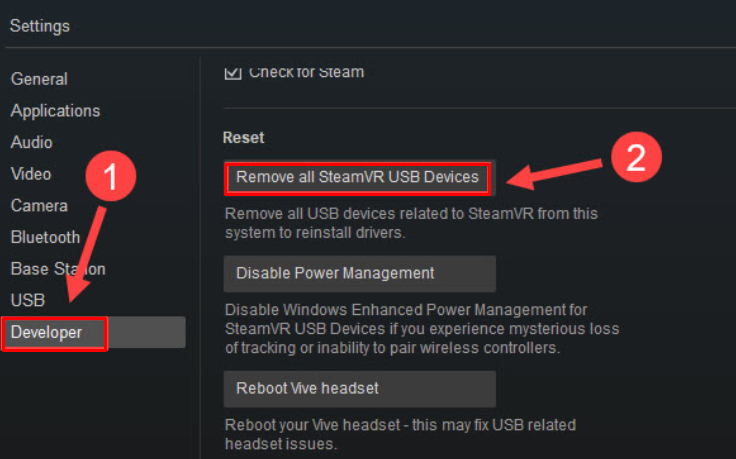
- In SteamVR, go to “Settings > Developer“.
- Click on ‘‘Remove all SteamVR USB Devices’‘ and “Disable Power Management”.
- After removing the devices, unplug your headset and then plug it back in to force the drivers to reinstall.
7. Reinstall The SteamVR (if necessary)
Reinstalling will remove any corrupted files and install new files from the SteamVR server.
- If the above steps do not work, you may need to reinstall SteamVR.
- Go to your “Library” in Steam, find SteamVR under Tools, right-click and select ‘‘Uninstall’‘.
- After uninstalling, restart your computer and then reinstall SteamVR from Steam.
- Remove other USB connections such as Controllers or USB sticks other than the internet and reconfigure the headset again.