Dealing with the frustrating “Error 301: A key component of SteamVR isn’t working properly” message can put a damper on your virtual reality experience.
This common SteamVR error when you lauch the Stam VR and the Steam unable to load important program file to run VR settings due to software conflicts, and currupted file data.
Fortunately, there are a few straightforward troubleshooting steps you can take to get your VR headset back up and running in no time.
In this guide, we’ll walk through several methods for resolving Steamvr Fail Error 301 A Key Component Of Streamvr Isn’t Working Properly.
Why SteamVR Fail Error 301 A Key Component Of StreamVR Isn’t Working Properly Occurs?
SteamVR error 301 occurs for a variety of reasons:
- Incorrect file paths in SteamVR configuration: SteamVR relies on specific file paths to locate components like drivers, runtimes, etc.
- Corrupt SteamVR installation: Issues during SteamVR installation like incomplete files, registry errors etc. can lead to error 301.
- Outdated graphics drivers: Old graphics drivers cause compatibility issues with SteamVR leading to error
- Hardware problems: Defective or disconnected VR headset cables, USB ports, display adapters etc. can trigger error 301 in SteamVR.
- System changes: Hardware changes like adding/removing components, overclocking etc. can also cause SteamVR to suddenly get error 301.
- OS Issues: Problems with Windows like pending updates, corrupt OS files or registry issues prevent SteamVR from working correctly.
How To Fix SteamVR Error 301 A Key Component Of StreamVR Isn’t Working Properly Issue

1. Power Cycle PC and Headset
Powercycling will stop the electric flow and helps the system hardware to reset to clean state avoiding uneccasry technical glitches.
- Press the universal “Power button” at the back of the headset to power off it.
- Unplug the Headset from the PC if it is connected via USB.
- Close the Steam application.
- Shut down the PC from accessing the Start menu.
- Unplug the power cable, wait 2 minutes and replug it.
- Power on the PC and Headset by pressing the respective power on button.
- Launch the Steam application and Steam VR.
- Reconnect the Headset via USB, once detected, Disconnect the USB
- Connect it via “Bluetooth setting.“
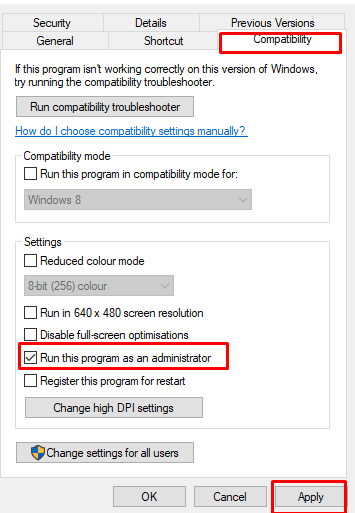
2. Launch SteamVR as Administrator
The Steam Client might not launch the crucial components if it doesnt have the administrator permission. So try run Steam Client as administrator and Launch the Steam VR.

- Right Click on the App on the Desktop
- Go to “properties” and click on “Compatibility” Tap
- Check the check box “Run this program as an Administrator”
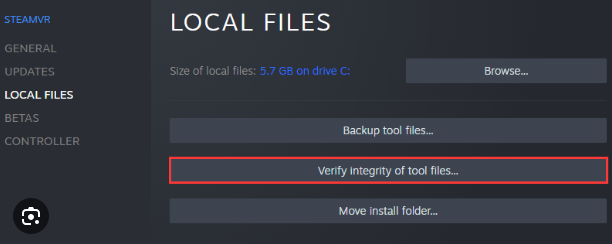
3. Check Steam VR integrity File
Verifying the integrity of the SteamVR tool checks for corrupted files and automatically repairs missing or corrupted files in your SteamVR installation.

- Open the “Steam” client on your PC.
- Navigate to the ‘‘Library’‘ section.
- Right-click on ‘‘SteamVR” and select ‘‘Properties’‘.
- Go to the ‘‘Local Files’‘ tab and click on ‘‘Verify integrity of tool files’‘. Wait for the process to complete before restarting SteamVR.
4. Delete VRPATH File
Here are the steps to resolve a SteamVR issue by deleting the openvrpaths.vrpath file:
- Open File Explorer and navigate to “%localappdata%/openvr”.
- Locate and delete the “openvrpaths.vrpath” file inside the openvr folder.
- Restart your PC and Headset.
- Put on your VR headset and launch SteamVR. Steam should regenerate the new “openvrpaths.vrpath” file with default settings.
5. Re-enable The Camera
The error also occurs if Steam VR unable to load the Camera settings and unable to recogonise the Camera.

Steps to re-enable the camera in SteamVR:
- Launch SteamVR.
- Click on the dropdown menu in the upper left corner and select “Settings”.
- In the left panel, click on “Camera”.
- Uncheck the box next to “Enable Camera” to turn on the front-facing camera passthrough.
- Click “OK” to save the changes.
- Restart SteamVR if it is already running.
- Again go to “Settings> Camera > Mark the Check box” to enable the camera
- You can now see the real world surrounding you through the front-facing camera feed.
6. Update The Windows OS And GPU
Verify that your Windows operating system is up to date. SteamVR requires specific updates to function properly:
Update Windows:

- Navigate to “Settings > Update & Security > Windows Update.”
- Click on “Check for Updates and install any available updates.
- Restart your computer to complete the installation of the updates.
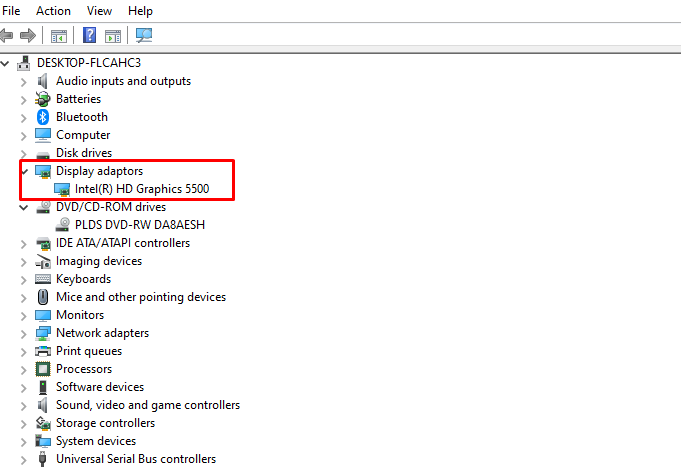
Update GPU:

- Type “Device Manager” in the Windows start Bar and Click on it
- Expand “Display Adaptor” and Right click on “Graphic Driver“
- Click on “Install” and click on Automatically search for drivers.
- The system automatically updates the driver from the internet
- Alternatively, You can also download updates from official websites(NVIDIA Driver Downloads, AMD Drivers and Support and Intel Driver & Support Assistant) and install them.
7. Reinstall The SteamVR
Sometimes, a fresh installation of SteamVR is required to clear up any issues that prevent it from launching.

- Uninstall SteamVR:
- Open the “Steam” client.
- Navigate to the ‘‘Library’‘ section.
- Right-click on ‘‘SteamVR’‘ in your list of games.
- Select ‘‘Uninstall’.‘
- Reinstall SteamVR:
- After the uninstallation completes, restart your computer.
- Open Steam and go to the ‘‘Store’‘
- Search for ‘‘SteamVR’‘ and select it from the list of results.
- Click on the ‘‘Install’‘ button to reinstall the application.
