Comcast Business Modem offers a range of modems and gateways tailored to the needs of small to medium-sized businesses, providing high-speed internet and networking solutions.
Comcast Business modem features and settings will help you tailor your network’s performance to your company’s specific needs, manage security protocols, control access, and potentially enhance the overall efficiency of your network.
This article provides a Comcast Business modem review, focusing on their setup, settings, and overall performance.
Step-By-Step Comcast Business Modem Setup Process

The setup process for a Comcast Business modem is designed to be straightforward, allowing business owners or IT personnel to get their network up and running quickly.
Steps to Setup Comcast Business Modem
1. Camcost Modem Installation Setup
- Connect the coaxial cable from your wall outlet to the modem, ensuring it is tightly secured.
- Powering On: If your modem has a power button, press it to turn on the device. If there is no power button, plugging in the modem will automatically power it on.
2. LAN Setup On Comcast Modem
- For initial setup, you may need to activate the modem. Connect the Modem with a Coaxial cable from the service provider.
- Connect a Computer with a Modem using an Ethernet cable.
- Follow the on-screen setup instructions and enter the IMEI number provided on the backside of the modem.
- Check the Internet connection by visiting the Google.com in your browser.
3. WiFi Setup On Comcast Modem
To connect to a Wi-Fi network broadcasted by a Comcast Business modem, follow these steps:

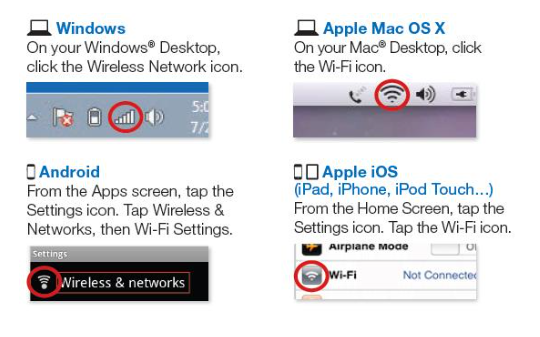
- Turn On WiFi on your devices:
- For Android: Go to “Settings” in your mobile device>> “Network and Internet” >> Toggle on “WiFi” and Click on it
- For Ios: Go to “Settings” App > “WiFi” > “Toggle on WiFi”
- For Windows: Go “start” > Type “WiFi” and click on it >Toggle “WiFi” On > “Show Available Network.“
- For Mac: Click on the “Wi-Fi icon” located in the menu bar at the top right corner of your screen > Turn “ON” WiFi

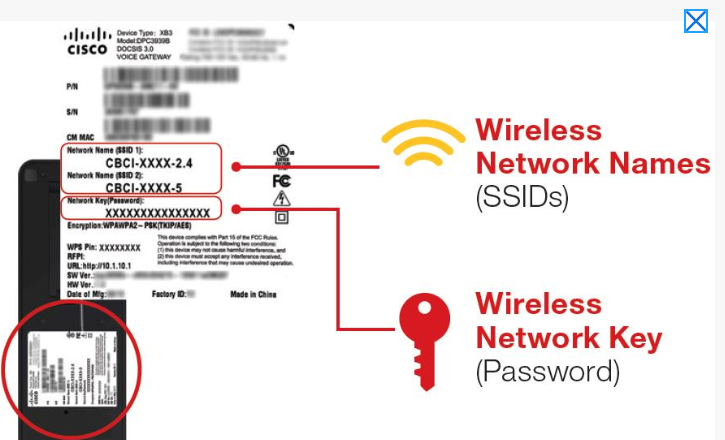
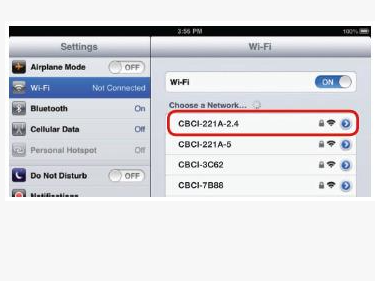
- Your device will search for available Wi-Fi networks. You can find Comcast WiFi Names such as “CBCI-XXXX-2.4″ and “CBCI-XXXX-5.”


- To find the credentials turn back your network gateway and record the WiFi names(SSID) and Network key on the back side sticker of the modem.
- The Network Key is a password for a WiFi connection and it is the same for both the WiFi SSID.

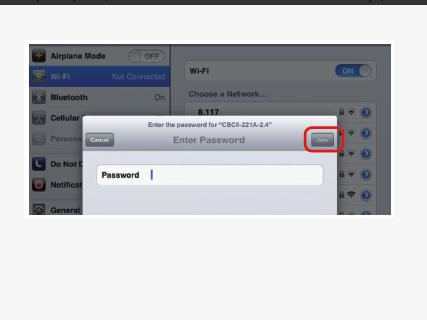
- Select one of the networks (“CBCI-XXXX-2.4” and “CBCI-XXXX-5”), enter the password (Network key) and select “Connect”.
- Once connected, you should see an indication on your device that you are connected to the Wi-Fi network, such as a Wi-Fi icon in the status bar or a confirmation message.

In some cases, especially when multiple services such as phone lines are involved, you need to set up a unique network inside your home or office, a Comcast technician may need to visit to complete the installation.
How To Access the Xfinity Public WiFi Hotspot
As a subscriber to Comcast Business Internet, this hotspot and the extensive network of Xfinity WiFi hotspots in the area are available to you.
To get online with an Xfinity WiFi hotspot, simply:
- Turn On Wi-Fi: Activate the Wi-Fi option on your device to search for networks.
- Allow your device a moment to detect all nearby Wi-Fi connections.
- Identify and select “xfinitywifi” from the network options available.
- Connect to the “xfinitywifi” network by selecting it.
- Open any web browser, and it should redirect you to the “Xfinity WiFi sign-in page.“
- Use your “Xfinity account details” to log in or agree to the service terms if prompted on the sign-in page.
- Once authenticated, you’re ready to surf the web through the “Xfinity WiFi hotspot.“
- Note that Xfinity WiFi hotspots are complimentary for Xfinity Internet subscribers, and non-subscribers may need to purchase a pass for usage.
Network Settings and Configurations For Comcast Modem
The Comcast Business modem, also often referred to as a Business Wireless Gateway, provides a variety of settings that can be configured to customize and secure your business network.
Some of the key settings you will find in a Comcast Business modem:
1. Network Settings For Comcast Modem
- Wi-Fi Configuration: You can configure your wireless networks, including setting up separate SSIDs for private and public use. This includes changing the network name (SSID), password, and the type of encryption (WPA, WPA2, etc.) to secure your wireless network.To modify the Wi-Fi settings such as name (SSID) and password on a Comcast Business modem, follow these steps:
- Guest Network: A guest network allows visitors to access the internet without giving them access to the entire business network. This network can be configured with its own SID and security settings. Follow The Steps To Add Guest Network:
- Log in to the Admin portal
- Click on three “Horizontal Lines” at the top left corner of the screen >. > “Settings” > “WiFi Settings” > Add “WiFi Network” > Select “Guest” network type.
- Enter your preferred “WiFi Network Name“.
- Select “Open” from the “Security” dropdown, If you don’t want to implement a password-protected guest network.
- Select “Save.”
- MAC Address Filtering For Comcast Modem: This security feature allows you to control which devices can connect to your network by creating a list of allowed MAC addresses. Steps To Add Mac Address:
- Log in to the Admin portal
- Click on three “Horizontal Lines” at the top left corner of the screen >. > “Settings” > “Home Network” > “Mac FIltering” > “Mac Filtering Type” >“On” from dropdown
- You will get a list of Mac addresses, Select your device’s Mac address and select “Add” and “Save.”
- DHCP Settings: The Dynamic Host Configuration Protocol (DHCP) settings enable you to manage IP address distribution within your network. Follow the enable DHCP Setting:
- Go to “Settings” > “Gateway” > “IP address” > Toggle on “DHCP Setting.“
- Go to the admin portal by entering the default IP address and Login.
- Look for a tab or section labelled ‘Gateway settings and click on ‘Connection’, or ‘Wireless’, which will take you to the wireless settings.
- Find the field labelled ‘SSID’ or ‘Network Name’ and click on the “Edit” button next to the name. Enter your new desired Wi-Fi name here.
- Look for a field ‘Network Key’, or similar under the same section where you changed the SSID. Enter your new desired password here.
- After entering the new SSID and password, look for a ‘Save’ button to save your changes. Reconnect Your Devices with the new Wi-Fi name using the new credentials.
2. Firewall and Security Settings For Comcast Modem
- Firewall Configuration: You can adjust the level of security by configuring the firewall settings, which may include options like IPv4 and IPv6 firewall protection, port forwarding, port triggering, DMZ, and other advanced features. Here Are The Steps To Configure Firewall Settings:
- In the menu on the left-hand side, click “Gateway” -> “Firewall“> “IP4″ > “Minimum Security (Low)” option ( You can also choose other options like medium or high) >”Save Settings” in the bottom of the menu.
- Your router may automatically reboot at this point.
- Port Forwarding: This allows you to direct incoming traffic to specific devices on your network, which is useful for running servers or certain types of remote access. Follow The Steps To Enable Port Forwarding:
- Login to admin portal > Go to “Advanced” Navigation menu >Select “Enable” for Port Forwarding > Select “+Add Service“
- From the Common Service list, select the service you want to run on the computer. Select Other if the service is not listed.
- If Other is selected, complete the following fields:
- Service Name: The name for the server that you want to configure ex Database or Ngnix.
- Service Type: The protocol used by the server.
- Start Port: The start port number of the port range.
- End Port: The last port number of the port range. If you only want to specify one port, use the same number as in the Start Port field.
- Server IPv4 Address: The IP address of the server to which you want to assign the service.
- Server IPv6 Address: The IP address of the computer to which you want to assign the service. You can also add from the IPV6 list if the address is displayed.
- Port Triggering: Similar to port forwarding, port triggering opens an incoming port based on outbound traffic, which is useful for applications that require multiple connections. Steps For Configuring Port Triggering:
- To set up port triggering on your Comcast Business Gateway, follow these steps:
- Login > “Advanced settings” > “Port Triggering” > Choose “Enabled” from the “Enable Port Triggering” dropdown menu > “+ADD PORT TRIGGER”
- Configure Port Triggering Rule: On the “Add Port Trigger” page, fill in the required fields:
- Service Name: Enter a descriptive name for your new rule (e.g., FTP).
- Service Type: Choose the protocol used by the service (e.g., TCP).
- Trigger Port From: Enter the starting port number for the range you want to trigger.
- Trigger Port To: Enter the ending port number for the trigger range. If you’re only triggering a single port, repeat the same number as in the “Trigger Port From” field.
- Target Port From: Enter the starting port number for the target range.
- Target Port To: Enter the ending port number for the target range. For a single port, this will be the same as the ‘Target Port From’ number.
- Save the Configuration: After entering all the details, click ‘Save’ to apply the new port triggering configuration.
3. Device Management Configuration For Comcast Bussiness Modem
- Device Restart and Reset: You can remotely restart the modem or reset it to factory defaults through the admin portal.
- To Reset Modem: Press the reset button at the back of the Modem for 12 sec
- To Restart the Modem: Press the power button Off, wait 5 sec and Press again the Power button on the back side of the modem.
- Firmware Updates: Comcast typically manages firmware updates automatically, but you can check the status and details of your modem’s firmware through the settings.
- System Logs: This feature allows you to view logs that can help diagnose network issues or monitor activity. Usually you can find the system log option at the end of the Comcast Modem front page panel.
4. Advanced Settings For Comcast Business Modem
- Static Routing: This allows you to define specific paths for traffic to take through your network, which can be important for complex network setups.
- DMZ: The Demilitarized Zone (DMZ) feature allows you to expose one device on your network to the internet, bypassing the firewall for that device. This can be necessary for certain applications but should be used with caution due to the security implications.
- VPN: Some Comcast Business modems may support Virtual Private Network (VPN) pass-through for secure remote access.
- IPv6: As the internet transitions to IPv6, Comcast Business modems support IPv6 configuration for future-proofing your network.
To access and modify these settings, you typically need to log into the modem’s admin portal using a web browser.
Pros and Cos of Comcast Business Modem
Comcast Business modems are designed to cater to the specific needs of businesses, offering a range of features and services.
Here are some pros and cons of using a Comcast Business modem:
Pros:
- Integrated Solutions: Comcast Business modems often come as part of a package that includes internet, phone, and television services, providing an all-in-one solution for business connectivity needs.
- Professional Installation: Comcast Business usually offers professional installation, ensuring that the modem and overall network are set up for optimal performance.
- Dedicated Business Support: Comcast Business customers have access to dedicated customer service and technical support, which is crucial for resolving issues quickly and minimizing downtime.
- Service Level Agreements (SLAs): Comcast Business provides SLAs that guarantee a certain level of uptime and service reliability, which is important for business operations.
- Reliability: Business modems are built to be robust and provide consistent service. They include features like dual-band WiFi and support for multiple Ethernet connections.
- Security Features: These modems typically come with advanced security features to help protect the business network from external threats.
- Static IP Addresses: Comcast Business offers the option of static IP addresses, which are often necessary for certain business applications and remote access needs.
Cons:
- Cost: Comcast Business services, including the modem rental, can be more expensive than residential services.
- Customization Limitations: Business modems from Comcast may have limitations on customization and may not allow for certain advanced configurations that third-party modems might offer.
- Firmware Control: Comcast maintains control over the firmware of the modems, meaning that users cannot manually update or change the firmware to suit specific needs.
- Contract Terms: Some business plans may require longer-term contracts with early termination fees, which can be a downside for businesses looking for flexibility.
- Hardware Options: There may be limited choices regarding the make and model of the modem provided by Comcast Business, which may not meet the specific needs or preferences of all businesses.
