Are you tired of having a plain and boring video background?
Do you want to add some excitement and creativity to your videos without the need for a green screen?
In this article, we will guide you through the simple steps to change your video background in CapCut
How To Change Video Background In CapCut
There are two main ways to change the video background in CapCut:
1. Use the Green Screen effect: Film yourself against a solid green background and CapCut will automatically replace it with any image or video you select.
2. Use the Mask effect: Draw a mask around the subject in your video frame-by-frame. CapCut will make everything outside the mask transparent and overlay your new background imagery.
Changing the video background in CapCut can be a straightforward process, especially if you’re using a green screen. Here’s how you can do it:
Step 1: Upload Your Video
Open CapCut and start a new project. Import the video with the green screen into your timeline.
Step 2: Add Green Screen Video as Overlay
Tap on the ‘Overlay’ button and select your green screen footage to add it on top of your background clip.
Step 3: Use Chroma Key

Select the green screen clip in the overlay track, then find and tap on the ‘Chroma Key’ feature. This will allow you to remove the green background.
Step 4: Adjust Chroma Key Settings
Fine-tune the Chroma Key settings by adjusting the strength and shadows to ensure that the green screen is removed cleanly, without affecting the main subject of the video.
Step 5: Add Your Background Clip
If you haven’t already, import the background clip you want to use into CapCut and adjust it below the green screen layer in the timeline.
Step 6: Export Your Video
Once you’re satisfied with the background and the overlay, export your video by tapping on the ‘Export’ button and choosing your desired resolution and frame rate.
how to change video background in capcut without green screen
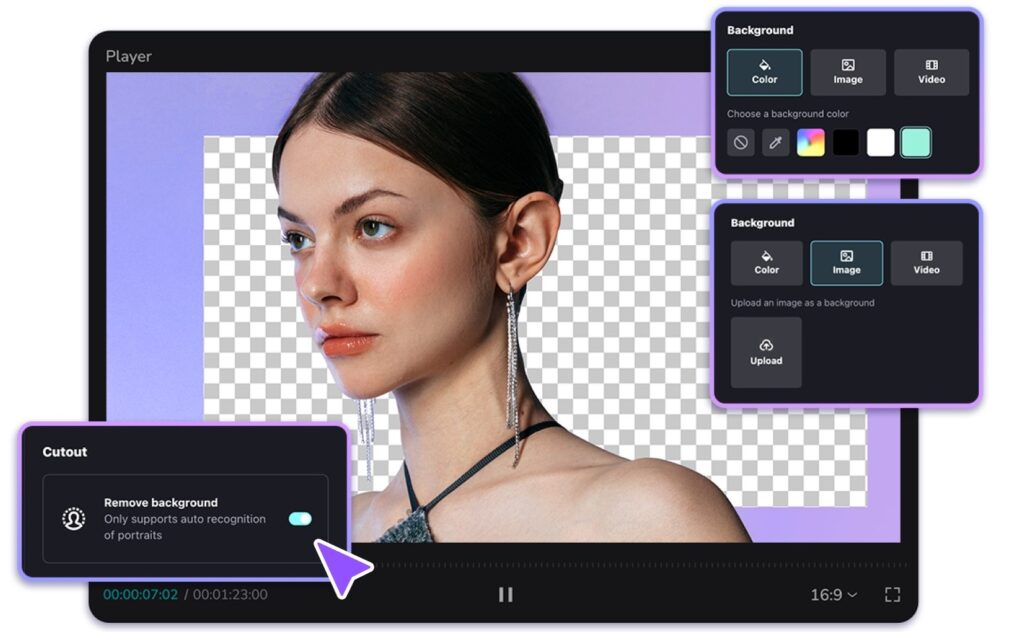
Alternatively, if you don’t have a green screen, CapCut provides a tool to remove the video background directly:
Step 1: Open the CapCut App
Launch the CapCut app on your mobile device. If you haven’t already downloaded it, you can find it in the App Store or Google Play Store.
Step 2: Start a New Project
Tap on the ‘New Project’ button to start editing. This will take you to your device’s gallery.
Step 3: Import Your Video Clip
Select the video clip you wish to edit from your gallery and import it into the project.
Step 4: Select the Video Clip
Once the video is imported, it will appear on the timeline at the bottom of the screen. Tap on the clip to select it for editing.
Step 5: Access the Background Option
With the clip selected, look for the “Background” option in the menu. This option might be directly visible or found under a menu like ‘Format’ or ‘Edit’, depending on the version of CapCut you are using.
Step 6: Choose a New Background
You can now choose a new background for your video. CapCut offers a variety of pre-existing backgrounds that you can use, or you can tap on the ‘Import’ option to add a custom background from your device’s gallery.
Step 7: Adjust the Background
Once you’ve selected your new background, you can resize and reposition it to fit your video frame. You can also adjust the duration of the background to match the length of your video clip.
Step 8: Edit and Blend
Use CapCut’s editing tools to blend the new background with your video. You might have options to adjust the brightness, contrast, and saturation to make the background more cohesive with the original clip.
Step 9: Preview Your Video
After making the adjustments, preview your video to ensure that the new background looks natural and as intended.
Step 10: Export Your Video
If you’re satisfied with the new background, tap on the ‘Export’ button to save your video. Choose your desired video quality and save the finished product to your device or share it directly to social media platforms.