
Are you new to the Meta Quest 3 and wondering how to add friends to your VR experience?
Adding friends can enhance your virtual reality experience by allowing you to connect with others and share your adventures.
In this article, we will guide you through the steps to add friends on your Meta Quest 3.
How To Add Friends On Meta Quest 3?

Method 1. Adding Friends Using the Meta Quest Headset
Step 1: Accessing the Universal Menu
- To begin, ensure your Meta Quest headset is powered on and properly set up.
- Press the Oculus button on your right Touch controller. This will open the universal menu, which is your gateway to the headset’s various features and settings.
Step 2: Navigating to the Social Features
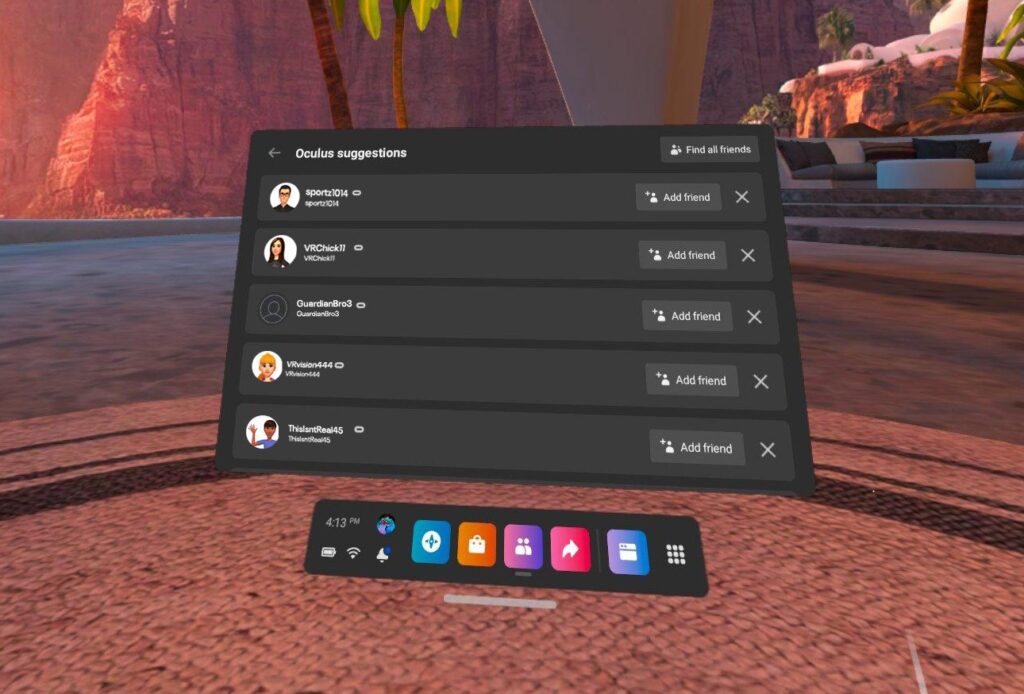
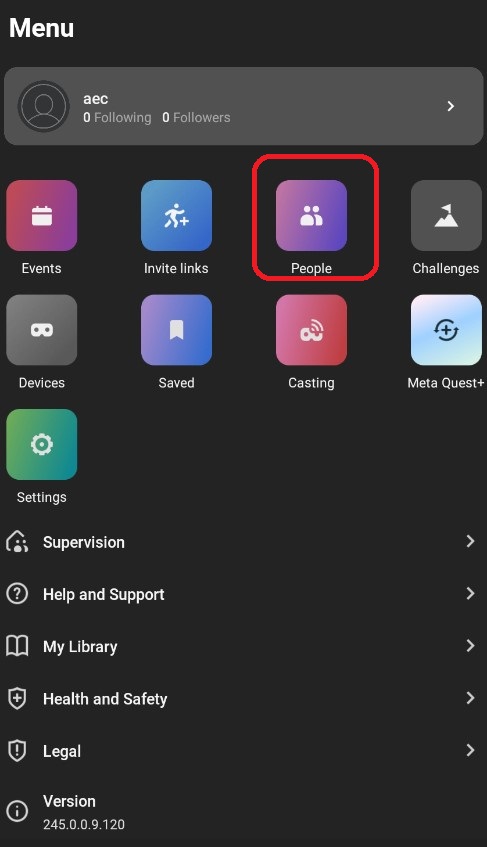
- In the universal menu, you’ll see various icons that represent different functions of the headset.
- Look for the ‘People‘ icon, which is typically symbolized by an outline of two individuals. Select this icon to access your social options.
Step 3: Searching for Friends
- Once in the ‘People‘ section, you’ll find an option to search for friends. This is usually indicated by a magnifying glass icon.
- Click on the Search Icon to bring up the search bar where you can type in the Meta Quest ID or the real name of the person you’re looking to add.
Step 4: Sending a Friend Request
- Enter the details of the friend you’re searching for. Make sure you have the correct spelling of their Meta Quest ID or the name associated with their account.
- The system will search and present you with a list of profiles that match your search query.
- Navigate through the results to find the correct profile of your friend. Once you’ve located it, you can view their public profile information to confirm it’s the right person.
Step 5: Following or Adding as a Friend
- On the person’s profile, you’ll have the option to ‘Add Friend‘ or ‘Follow‘.
- By choosing to ‘Add Friend’, you’ll send a friend request to that user. They will need to accept your request before you’re officially connected as friends on the platform.
- If you opt to ‘Follow‘ the person instead, you won’t be directly connected as friends, but you’ll be able to see updates from them, much like following someone on social media.
Step 6: Confirming the Friend Request
- After sending a friend request, wait for the other person to accept it. You can check the status of your sent requests in the ‘People‘ section under ‘Requests‘.
- Once the person accepts your friend request, you will receive a notification, and they will appear in your friend’s list.
Step 7: Interacting with Friends
- With friends added, you can now interact through various means such as joining each other in games, visiting each other’s virtual spaces, or simply chatting through the built-in communication tools.
Method 2. Using the Oculus Mobile App
Step 1: Launching the Oculus Mobile App
- Start by opening the Oculus mobile app on your smartphone. If you haven’t already done so, download the app from your respective app store.
Step 2: Accessing the Social Features
- Once you’re on the home screen of the Oculus app, look for the ‘People‘ icon. This is typically found at the bottom of the screen and may resemble two silhouettes or a single person depending on the app’s design updates.
Step 3: Searching for Friends
- Tap on the ‘People‘ icon to access your current friends list and other social features.
- To add new friends, tap on the magnifying glass icon, which signifies the search function.
- Enter the Meta Quest ID or the real name of the person you want to add. Make sure you have the correct information to find the right person.
Step 4: Sending a Friend Request or Following
- The app will display profiles that match your search. Scroll through the results until you find the profile of the person you are looking to add.
- Once you’ve found the right profile, you can either send them a friend request or choose to follow them.
- To send a friend request, tap on the ‘Add Friend‘ button next to their profile. This will send a notification to the user that you want to connect.
- Alternatively, if you simply want to follow their updates without adding them as a friend, tap the ‘Follow‘ button.
Step 5: Managing Friend Requests
- After you’ve sent a friend request, you can check the status in the ‘People‘ section under ‘Requests Sent‘. Here, you can see if your request has been accepted or is still pending.
- When someone sends you a friend request, you’ll receive a notification in the app. You can accept or ignore the request as you see fit.
Step 6: Interacting with Friends
- Once the friend request is accepted, you can interact with your new friend through the app. You can message them, see their activity, and join them in VR experiences that support multiplayer features.
Method 3. Using the Oculus PC App
Step 1: Navigating to Social Features
- Once the app is open, look to the bottom left menu area. You should see a ‘Friends‘ section, which is dedicated to managing your social interactions. Click on this to access your friends list and find new friends.
Step 2: Using the Search Function
- In the ‘Friends‘ section, there will be a search bar or a magnifying glass icon indicating the search function.
- Click on this and type in the Meta Quest username or the first and last name of the person you wish to add. The search is designed to help you find users by their Oculus ID or their linked Facebook account information.
Step 3: Sending Friend Requests or Following
- The search results will show profiles that match your input. Browse through the results to locate the correct profile of the individual you want to connect with.
- Once you’ve identified the right person, you can send them a friend request by clicking on the ‘Add Friend‘ button, which might be symbolized by a person with a plus (+) sign.
- If you prefer to follow their activities without being friends, click on the ‘Follow‘ icon, often represented by an eye or a star.
Step 4: Managing and Accepting Friend Requests
- After sending a friend request, you can monitor its status in the ‘Outgoing‘ section under ‘Friend Requests‘.
- Similarly, when you receive friend requests, they will appear in the ‘Incoming‘ section, where you can accept or ignore them as you choose.
Step 5: Engaging with Your Friends List
- Once your friend request is accepted, you can view your new friend’s profile, start direct messages, and see their online status and activities.
- You can also organize and join VR sessions directly from the app, making it easy to plan your next multiplayer adventure