
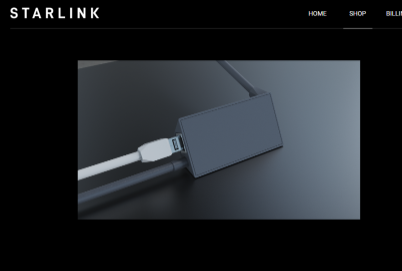
The Starlink Ethernet adapter is an accessory that adds an Ethernet port to your Starlink system, allowing you to connect wired devices like Smart TVs, computers, or network cable-connected devices.
However, if you’re looking for alternatives to the official Starlink Ethernet adapter, there are a few options available in the market.
In this blog, Let’s see ssome best Sarlink Ethernet Adapter alternative to get seamless internet connection.
What Are The Alternatives For Starlink Ethernet Adapter
If you need an alternative to the official Starlink Ethernet adapter, consider the following options and steps to get your wired connection up and running:
Option 1: WiFi Extender with Ethernet Port
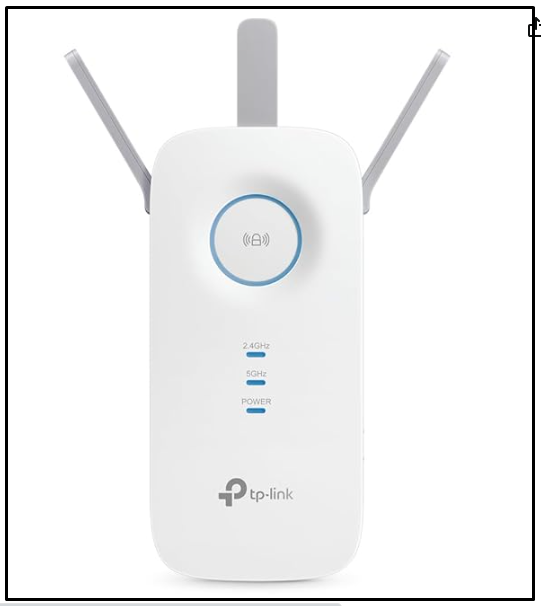
You can use WiFi extender with ethernet port. The WiFi extender share the internet via WiFi from the ethernet cable.
- Purchase a WiFi extender with an Ethernet port, such as the TP-Link AC1750 WiFi Extender RE4503
- Connect the WiFi extender to your Starlink router via WiFi.
- Connect your wired devices to the Ethernet port on the WiFi extender.
Option 2: Spare Computer or Laptop
If you dont want to buy extra unit to share network, you can consider using any Computer or Lap as switch and you can connect other dvices by connecting to the shared internet by the Computer or Laptop.
- Connect a spare computer or laptop to the Starlink router via WiFi.
- Share the connection over an Ethernet port.
- Connect your wired devices to the Ethernet port on the computer or laptop.
To share a Wi-Fi network from a Windows computer
- Go to ‘‘Control Panel’‘ > ‘‘Network and Sharing Center’‘ > ‘‘Change adapter settings’‘.
- Right-click on your Wi-Fi connection and select ‘‘Properties’‘.
- Click on the ‘‘Sharing’‘ tab.
- Check the box that says ‘‘Allow other network users to connect through this computer’s Internet connection’‘.
- From the dropdown menu under ‘‘Home networking connection’‘, select the connection you want to share with (e.g., Ethernet or Local Area Connection).
- Click ‘‘OK’‘ to apply the settings.
To share a Wi-Fi network from a Mac:
- Click the “Apple menu” and go to ‘‘System Preferences’‘ > ‘‘Sharing’‘.
- Select ‘‘Internet Sharing’‘ from the list on the left.
- Choose ‘‘Wi-Fi’‘ from the ‘‘Share your connection from’‘ dropdown menu.
- In the ‘‘To computers using’‘ list, check the box next to ‘Ethernet’ or whichever port you wish to share the connection through.
- Click the checkbox next to ‘‘Internet Sharing’‘ to enable sharing. A green icon will appear when sharing is active.
- Connect another device to the Ethernet port to access the shared Wi-Fi connection.
Option 3: USB to Ethernet Adapters
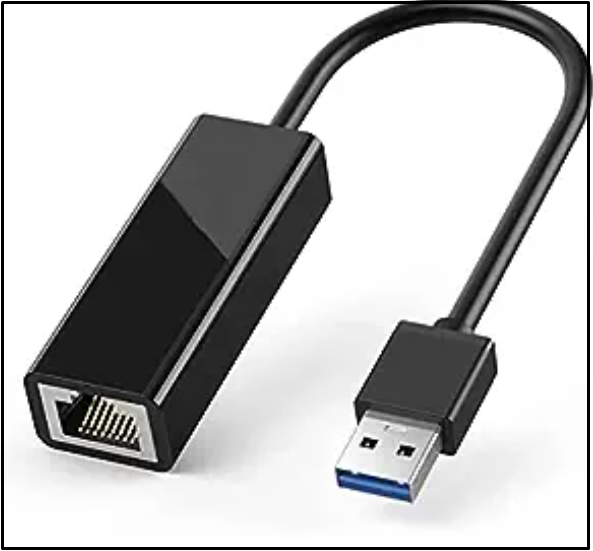
If your are using only one PC, for some reason your Etehrnet port is not working and want to access network via USB, you can use USB to ethernet converter.
So that you can connect devices with USB ports directly to your wired network an and the other end is connected to the direct ethernet from starlink router.
Check for USB 3.0 support for faster data transfer rates.
- Connect the starlink ethernet cable at the Ethernet port of the converted and take a USB.
- Connect the one end of USB to the USB port of the converter and other end to the Lap.
- Now check the internet connection.
Option 4: Network Switches
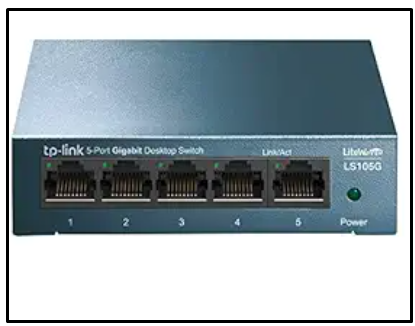
If you want Ethernet connection for you PC oe Laptop, you can go with network switches. Network switch will have one input and multiple output. You can consider buying TPLink switches.
It will be xost expensive when comparing other options and no need any configurations. All you need to do is powe ron the Switches once the following setup is made.
- You’ll need an Ethernet switch, Ethernet cables, and your internet source (such as a router or modem).
- Plug one end of an Ethernet cable into the uplink port (sometimes labeled as “WAN” or “Internet”) on the switch.
- Connect the other end of this cable to an available Ethernet port on your router or modem.
- Connect the power adapter to the switch and plug it into an electrical outlet.
- Connect the power adapter to the switch and plug it into an electrical outlet.
- Turn on the switch, usually by pressing a power button if there is one.
- Take additional Ethernet cables and plug one end into the devices you want to connect to the internet (like computers, gaming consoles, or smart TVs).
- Turn on your router or modem first and wait for it to fully boot up and connect to the internet.
- Power on the devices connected to the switch.
- Check each device to ensure they have internet access.
- If a device isn’t connecting, try rebooting it or checking the cable connections.
- Plug the other end of these cables into available ports on the Ethernet switch.
Expand your wired network by connecting multiple devices via a switchUse in conjunction with a Wi-Fi bridge for greater flexibility.