
When setting up a home or small office network, understanding the functions and use cases of different network devices and modes is crucial to optimize connectivity and performance.
Two common terms that often come up in the context of wireless networking are “router bridge mode” and “access point.”
Each serves a unique role in managing how devices connect and communicate over a network.
In this article, we’ll explore the key differences between router bridge mode and access points.
router bridge mode vs access point
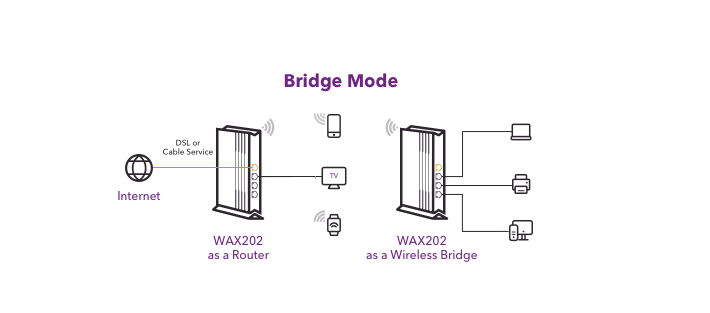
Bridge mode and access point mode are ways to set up a router for different networking needs.
In bridge mode, the router acts just like a modem, passing on the public IP address to another router.
This is handy when the router given by your internet provider isn’t strong enough, and you want to use a better one.
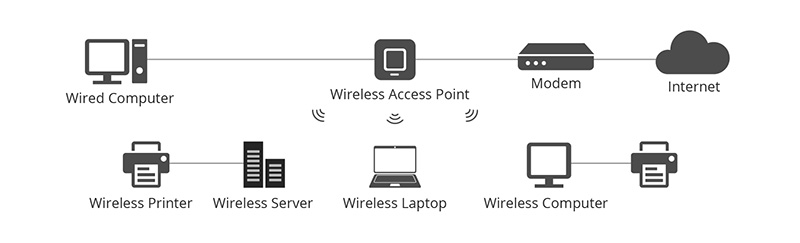
In contrast, an access point (AP) is a gadget that lets wireless devices join a wired network.
It’s hooked up to a router through a cable and can either be a separate device or part of the router itself.
An AP makes your Wi-Fi network cover more area and lets devices that are too far from the router get on the internet.
Wireless bridges are meant to link two separate networks over a wireless connection.
They’re used to connect groups of computers that are apart from each other, while an access point lets many wireless devices connect to a router.
Wireless bridges are often seen as more secure, adaptable, and cost-saving than access points.
However, they depend on having wired connections, whereas access points communicate with all connected devices using Wi-Fi signals from the router or AP unit.
table comparing Bridge Mode and Access Point Mode:
| Feature | Bridge Mode | Access Point Mode |
|---|---|---|
| Main Function | Connects two separate networks | Extends a wireless network |
| Acts Like | A modem, passing the public IP to another router | A device that allows wireless devices to join a network |
| Connection Type | Wired connection to another router | Wired connection to a router, then provides Wi-Fi |
| Best Used When | The ISP-provided router is not powerful enough | Need to extend Wi-Fi coverage |
| Device Integration | Can be a feature of a router or a standalone device | Can be a feature of a router or a standalone device |
| Network Coverage | Depends on the connected router’s capabilities | Increases Wi-Fi range for devices too far from the router |
| Security & Flexibility | Often seen as more secure and adaptable | Standard security and flexibility for Wi-Fi networks |
| Cost-Effectiveness | Can be more cost-effective than using multiple APs | Cost varies depending on the AP and setup complexity |
| Dependency | Relies on a wired connection to link networks | Uses Wi-Fi signals to connect devices |
How To Use Router Bridge Mode?
Here are general steps to set up your router in bridge mode, the exact steps might vary depending upon the model:
- Get into your router’s settings: Use a web browser to go to the router’s setup page. You can find the web address and the login details you need in the router’s manual or on a sticker on the router.
- Find the bridge mode option: Look around in the settings menu for bridge mode. It might be listed under sections like “Settings,” “Advanced Settings,” “Advanced Setup,” or “Wireless Bridge.”
- Turn on bridge mode: There should be an option like “Enable Bridge Mode” or something similar. Click on it to turn bridge mode on.
- Set up the second router: Now you’ll need to sort out the settings for the other router you’re extending. This includes the Wi-Fi name (SSID), security type, password, and whether you’re using the 2.4 GHz or 5 GHz band.
- Link the routers together: Use an Ethernet cable to connect the LAN port of the router from your internet service provider (ISP) to the WAN port of your own router. Also, connect the Wi-Fi from your ISP’s router to your own router’s Wi-Fi.
- Check the subnet mask: If you’re using a public IP address for your own router, you might need to tweak the subnet mask to make sure the routers talk to each other properly. Often, the default one your ISP gives you is fine.
- Save your settings: Once you’ve got everything set up, save your changes and restart the router if you need to. Your router should now be in bridge mode, letting both routers work together smoothly and giving you a bigger Wi-Fi area.
How To Use access point on the Router?
Here are general steps to set up your router in bridge mode, the exact steps might vary depending upon the model:
- Put the Access Point in the right spot: Find a good place for the access point where it can spread the Wi-Fi signal wide and clear, without too many walls or other things in the way.
- Hook it up with a cable: Grab an Ethernet cable and plug one end into one of the router’s LAN ports and the other end into the main Ethernet port on the access point.
- Tweak the Access Point settings: Log into the access point’s setup page using a web browser or its app. Here, you’ll name your Wi-Fi network (SSID), choose a security type, set a Wi-Fi password, and pick which frequency to use (2.4 GHz or 5 GHz).
- Finish the setup: After everything’s plugged in and the settings are good to go, your access point should be ready. Now you can enjoy a bigger and better Wi-Fi signal around your space.