
When it comes to managing a stable and secure internet connection at home, the AT&T BGW320 Wi-Fi Gateway stands as a popular choice among users.
However, like any technological device, it can encounter issues that disrupt your online activities.
Troubleshooting the BGW320 can seem daunting, but understanding the meaning behind the LED lights on the device and knowing the right steps to take can simplify the process.
AT&T BGW320 troubleshooting Steps
If you are facing issues with the AT&T BGW320, then you should check the LED indicators, make sure that there are no loose connections or faulty cables, and try resetting the gateway.
Down below, we have discussed the solution in step-by-step detail.
1. Check the Gateway Lights
The different colored lights on the front of the BGW320 provide visual clues about the status of the device.
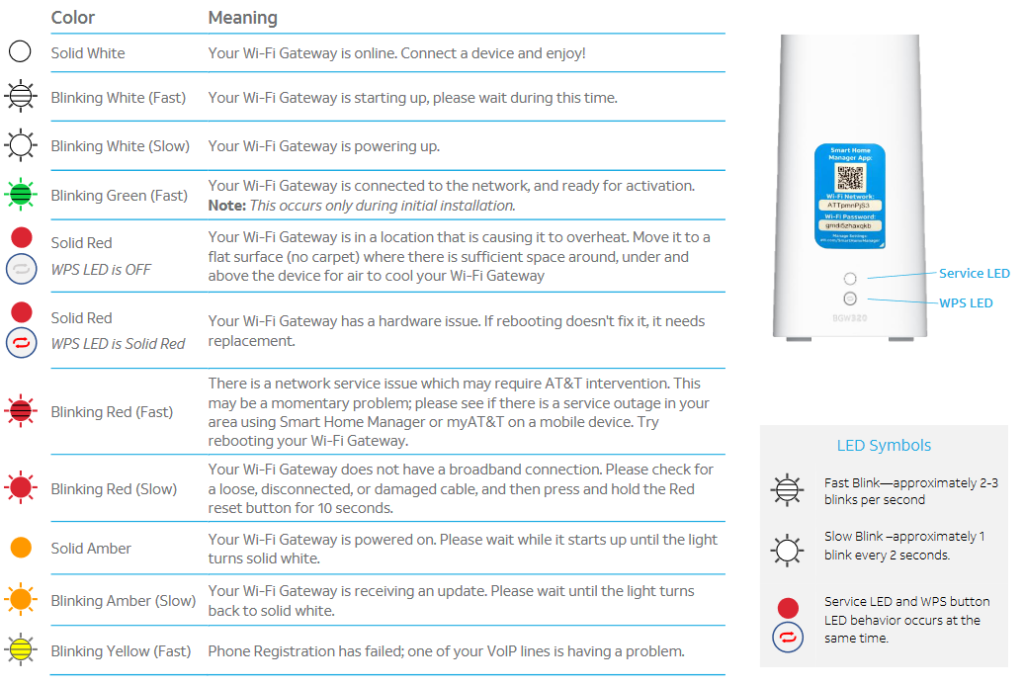
Here are the key troubleshooting steps based on the AT&T BGW320 gateway LED light indicators:
- Solid White Light: Gateway is online and working correctly. No action needed.
- Blinking White Light (fast): Gateway is starting up. Wait for light to turn solid white.
- Blinking White Light (slow): Gateway is powering up. Wait for light to turn solid white.
- Blinking Green Light (fast): Gateway is ready for activation during initial setup. Follow activation steps.
- Solid Red Light: Gateway is overheating. Move to well-ventilated location.
- Solid Red Light + Solid Red WPS Light: Hardware issue. May need gateway replacement if reboot doesn’t fix.
- Blinking Red Light (fast): Network service issue. Check for outage or contact AT&T support.
- Blinking Red Light (slow): No broadband connection. Check cables and reset gateway.
- Solid Amber Light: Gateway starting up. Wait for light to turn solid white.
- Blinking Amber Light (slow): Gateway updating. Wait for light to turn solid white.
- Blinking Yellow Light (fast): VoIP line registration failed.
- Blinking Green Light (fast): Gateway resetting. Wait for restart.
- Blinking Green Light (slow) + Solid White Service Light: WPS button pressed.
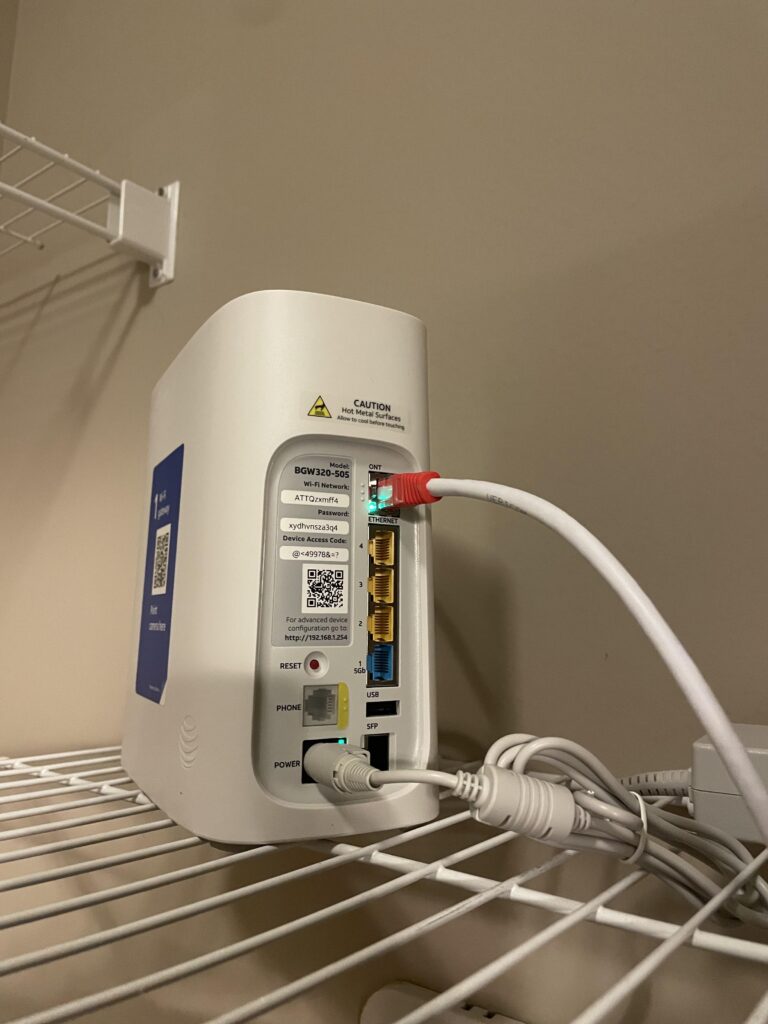
2. Check The Network Connection
It’s also important to check that all cables connecting to the BGW320 are fully plugged in.
This includes the power cable, ethernet cables to computers/devices, and the fiber optic or DSL line running to the wall jack.
Faulty or loose connections can affect connectivity. Disconnect and reconnect cables to ensure a tight fit.
3. Check for Service Outages

To check for service outages with your AT&T BGW320 Wi-Fi, visit the AT&T Outage Information page where you can view current service status and report an outage.
If there’s a widespread outage, these resources will provide updates and estimated times for when service will be restored.
4. Test with Direct Ethernet Connection
To isolate whether Wi-Fi is the culprit, try connecting a computer directly to the gateway via ethernet and testing speeds/connectivity.
steps to test your AT&T BGW320 gateway with a direct ethernet connection:
- Obtain an ethernet cable to connect your computer directly to the gateway. Make sure it is long enough to reach from your computer’s ethernet port to the location of your BGW320 gateway.
- Plug one end of the ethernet cable into the ethernet port on your computer. Make sure the cable clicks into place securely.
- Locate one of the yellow LAN ports on the back of your BGW320 gateway.
- Connect the other end of the ethernet cable to the yellow LAN port on the gateway. Push firmly so it clicks into place.
- On your connected computer, run speed tests to check your connectivity. You can use a website like speedtest.net to test speeds.
- Compare the speeds and connectivity to what you normally get over Wi-Fi. Direct ethernet connection provides a baseline for troubleshooting.
- If speeds/connectivity improve substantially with the wired connection, that indicates issues with your Wi-Fi network rather than the gateway hardware.
- Additional troubleshooting of Wi-Fi can then be performed to resolve wireless problems if needed.
5. try to replace/change the Wifi position at your home
If you’re experiencing issues with your AT&T BGW320 Wi-Fi, consider changing the position of the Wi-Fi gateway in your home.
Place the gateway in a central location, away from obstructions and reflective surfaces like mirrors and windows, to promote better signal distribution.
Elevating the gateway off the floor and ensuring it’s not tucked away in cabinets or behind large objects can also help improve Wi-Fi signal strength.
6. Reset the Gateway
If the lights indicate a potential hardware issue, the first troubleshooting step is usually to reset the gateway. This often resolves temporary glitches.
To restore your AT&T BGW320 Wi-Fi Gateway to its default factory settings, follow these steps:
- Locate the red Reset button on the back of the BGW320 gateway.
- Press and hold the Reset button for at least 10 seconds. Quickly pressing the button will simply reboot the device instead of resetting it.
- Continue holding the Reset button down for the full 10 seconds.
- Once 10 seconds have passed, release the Reset button. The gateway will begin restarting.
- Wait for the gateway to finish rebooting. When it powers back on, check that the Broadband and Service LED status lights are solid green. This indicates a successful reset to factory defaults.
- After resetting the device, you will need to reconfigure any custom settings that were previously set up. Examples may include your Wi-Fi network name (SSID), Wi-Fi password, assigned IP addresses, and more. Refer to the BGW320 user manual for instructions on setting up your gateway post-reset.
- Connect devices to the gateway and test network connectivity after configuring settings. Everything should be restored to original out-of-the-box condition.
7. Otherwise Contact AT&T Support

If you still can’t resolve the issue after trying these troubleshooting tips, contact AT&T support.
Be prepared to provide your account info and describe the problem in detail.
An AT&T support rep can run diagnostics, check error logs, or schedule a technician visit if necessary.