Experiencing issues with your Apple Vision Pro not functioning as expected can be frustrating.
Whether it’s failing to turn on, encountering connectivity problems, or dealing with unresponsive controls, troubleshooting such high-tech devices requires a systematic approach.
In this guide, we’ll explore common reasons why your Apple Vision Pro might not be working and offer practical steps to get your device back up and running smoothly.
Why Apple Vision Pro Not Working Issue?
If your Apple Vision Pro is not working, there could be several reasons behind the issue. Here are some common problems and their potential fixes:
1. Software Glitches
Minor software problems can sometimes cause the device to malfunction.
2. Battery Issues
If the battery is completely drained, the device may not turn on. Make sure to charge your Apple Vision Pro for a while before trying to turn it on again.
3. Connection Problems
If there are issues with the device’s connections to other devices or services, resetting the network settings might help. This will remove all network settings, returning them to factory defaults.
4. Outdated Software
Running an outdated version of the operating system could lead to compatibility issues. Ensure your device is updated to the latest version.
5. Corrupted Data
Sometimes corrupted files or settings can cause the device to stop working correctly. Performing a factory reset can help, but this will erase all data on the device, so it’s important to back up your data before doing this.
How to Fix Apple Vision Pro Not Working Issue

First check the Battery and WiFi connections, verify the Apple account, restart the device and Reset the network settings. If issue occurs again Update iOS and Vision OS, finally consider resetting the Apple Vision Pro.
1. Check Apple Vision Pro Battery Connection
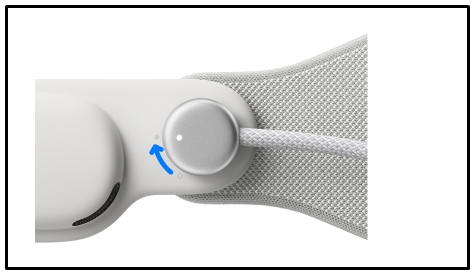
If the Apple Vision pro is not powered on, there might be an issue with the battery and connections. Make sure the battery is fully charged to avoid unnecessary connection issues.
- Align the power cable with the power connector on the left side of the Audio Strap, tilting the cord slightly upward.
- Match the dot on the power cable with the corresponding white outlined dot on the Audio Strap.
- Twist the power cable clockwise to secure it into place.
- Once the power cable is correctly connected, a pulsing light will indicate a successful connection and the Apple Vision Pro will power on.
2. Check the WiFi Connections
You should have connected with same WiFi the device is connected. If the Apple Vision pro is connected to different network, it might cause the error. Also move the headset closer to the Mac that you’re trying to connect to.
To check the WiFi Connection:
- Press “Crown Button” at the top of the headset.
- Click on “Settings” at the right panel and click on WiFi
- Where you can see the details and make sure you are in the same network as device.
3. Check Your Apple Account ID
The Apple Vision pro and the connected mac device should logged in with same Apple Account.
In Apple Pro Vision
- Press Crown button at the top of the headset to get Home view
- Here you can see the “Apple Id” under user profile.
- If it is not same, go to “Settings” and Click on Sign in
- Enter your correct Username and Password and login.
4. Restart Your Apple Vision Pro
A good first step in troubleshooting is to restart your device. This can often clear up minor software glitches that may be causing the problem.
To turn off the device, you can:
- Press and hold the “top button” and the “Digital Crown” simultaneously, then drag the slider when it appears.
- Navigate to “Settings“, select “General“, choose “Shut Down“.
- You can also use voice command and say, “Siri, turn off my Apple Vision Pro.”
- Remove the Apple Vision Pro, place it securely on a surface like a table or desk, and then disconnect the power cable from the Audio Strap.
To turn on your Apple Vision Pro, you can:
- Press and hold the “top button” for a few seconds until you see the Apple logo on the front display.
- If the battery was disconnected, reconnect it, and your Apple Vision Pro will power on automatically.
To Force Restart Apple Vision Pro
- Press and hold both the “top button and the Digital Crown” simultaneously.
- Continue holding both buttons even when the Force Quit Applications window and the power slider appear.
- Keep holding until the displays turn black.
- You may remove the Apple Vision Pro while it restarts.
- Watch for the Apple logo to appear on the front display.
- If the Apple logo doesn’t appear, press and hold the “top button” for a few seconds until it does.
5. Ensure Proper Fit and Clear View
For the Apple Vision Pro to function correctly, it must fit well and have a clear view of your eyes.
- Adjust the fit to make sure it’s snug but comfortable.
- Ensure nothing is obstructing the sensors or cameras responsible for eye tracking.
6. Check for Vision and iOS Software Updates
Ensure that your Mac is compatible with the system requirements. Mac Virtual Display is supported on any Mac running macOS 14 Sonoma or a later version. Updating OS will resolves any bug in software and removes corrupted files. Running outdated software can lead to various issues with your device ( Vision pro and iOS):
Update Apple Vision Pro:
Automatic Update Steps:
- Press “Crown button” to enter into home view
- Click on “App icon ” from the Tab bar to go to app list
- Open “Settings” on your Apple Vision Pro at the left side panel.
- Tap “General,” then “Software Update.“
- Select Automatic Updates.
- Turn on ‘Download visionOS Updates’ and ‘Install visionOS Updates’.
- Ensure your device is charging and connected to Wi-Fi to automatically update overnight, and await a notification before installation.
Manual Update Steps:
- Press “Crown Button” to go to Home view
- Go to “Settings” on your Apple Vision Pro at the left side bar.
- Choose “General,” then tap on “Software Update.“
- Check if an update is available.
- If an update is available, start the update process.
- Remove the Apple Vision Pro while it updates and monitor the update progress on the front display.
Update Apple Devices:
To update iOS on your iPhone or iPad: Connect your device to “Wi-Fi” > Go to “Settings” > Tap “General” >Select “Software Update” > If an update is available, tap” Download and Install.” > Enter your “passcode“ if prompted.
For automatic updates: Go to “Settings“> Tap “General” >Select “Software Update” > Tap “Automatic Updates” > Turn on “Download iOS Updates” and Install “iOS Updates.“
7. Reset Network Settings
It clears all saved Wi-Fi networks and passwords, cellular settings, as well as VPN and APN settings that you’ve used before, restoring network settings to their factory defaults. Connectivity issues can sometimes cause your Apple Vision Pro to malfunction:
- Press “Crown button” to enter home view
- Open “Settings” on your Apple Vision Pro at the left panel.
- Tap “General.“
- Select “Transfer or Reset Apple Vision Pro.“
- Tap “Reset.“
- Choose ‘‘Reset All Settings’‘ to remove all settings and reset them to defaults. This includes network settings, keyboard dictionary, location settings, privacy settings, surroundings data, and Apple Pay cards.
- Alternatively, choose ‘‘Reset Network Settings’‘ to remove all network settings.
- Note that this will erase all current network settings, including saved Wi-Fi networks and passwords.
8. Factory Reset Apple Vision Pro
If none of the above steps work, a factory reset may be necessary: A factory reset will erase all data and settings on your Apple Vision Pro, restore it back to the clean state. Ensure you back up any important data before proceeding with a factory reset.
To Back up Data on Apple Vision pro:
- Open “Settings” and tap on your name at the top.
- Select “iCloud,” then tap on “iCloud Backup“.
- Switch on “iCloud Backup.“
- To start a manual backup, tap on “Back Up Now.“
To Reset Apple Vision Pro:
- Once backed up, navigate to “Settings” and select “General.“
- Proceed to “Reset Apple Vision Pro“.
- Select “Erase All Content and Settings.“
- Enter your device passcode or Apple ID password when prompted.
- Confirm your choice to erase the device.
- Allow some time for your device to fully erase; this process could take a few minutes.