When using the Starlink app to manage your satellite internet service, you may occasionally encounter an issue where the app does not display the devices connected to your network.
This can be problematic when trying to monitor data usage, manage device access, or troubleshoot connectivity issues.
Such a glitch can stem from a range of causes, from minor software bugs to network configuration errors.
In this guide, we will walk you through the process of resolving the “Starlink App Not Showing Connected Devices” issue, ensuring you can effectively manage and monitor all devices on your Starlink network.
Why Starlink App Not Showing Connected Devices
The Starlink app not showing connected devices can be due to several reasons:
1. Software Bugs
The app may have glitches or bugs that prevent it from displaying connected devices properly.
2. Network Issues
If the devices are not properly connected to the network or there is an issue with the network’s configuration, the app might not be able to list them.
3. App Updates
An outdated version of the Starlink app may lack the latest features or fixes that ensure connected devices are shown.
4. Incorrect Settings
Certain settings within the app or the router might need to be adjusted to allow device visibility.
How to Fix Starlink App Not Showing Connected Devices
Check for disconnected status, reconfigure the WiFi on devices and power cycle the routers. Then disable bypass mode and power cycle the router. Finally, consider uninstalling and reinstalling the Starlink app.

1. Check For Disconnected Status
The Starlink app may show a “Disconnected” status when there is no connection between your phone and the Starlink router. If this occurs, try reconnecting to your Starlink WiFi network.
2. Reconfigure The WiFi Connection
Forgetting the network and reconnecting can help resolve issues such as incorrect password storage, IP address conflicts, or minor software glitches.
iOS (iPhone/iPad):
- Go to “Settings” > “Wi-Fi.“
- Tap on the information “icon (i)” next to the network you want to forget.
- Tap “Forget This Network” and confirm by tapping “Forget.”
- After the network is forgotten, go back to Wi-Fi settings, select the network again, enter the password, and reconnect.
Android:
- Open “Settings” and go to “Wi-Fi.“
- Tap and hold the Wi-Fi network you want to forget, then select ““Forget network.”“
- To reconnect, tap on the network again, enter the password, and connect.
Mac:
- Click the “Wi-Fi icon” in the menu bar and select “Open Network Preferences…”
- In the Wi-Fi section, click “Advanced…”
- Select the network you want to forget and click the “minus (-)” sign to remove it.
- Click “OK,” then “Apply.”
- To reconnect, click the Wi-Fi icon again, select the network, enter the password, and join.
Windows:
- Click the Wi-Fi icon in the system tray and select “Network & Internet settings.”
- Click on “Wi-Fi” and then “Manage known networks.”
- Click on the network you want to forget and select “Forget.”
- To reconnect, click the Wi-Fi icon in the system tray, select the network, enter the password, and click “Connect.”
3. Power cycle the Starlink router
Power cycling can clear any temporary glitches and issues related to connections.
- Turn off and unplug the router and dish.
- Wait 15-30 minutes to allow the router and dish to power down completely.
- Then plug them back in and turn them on.
- Also, turn off your connected devices. Unplug them if needed. Wait for 1 minute. Then power them back on.
- Rebooting the system fresh can resolve bugs and get your Starlink working again.
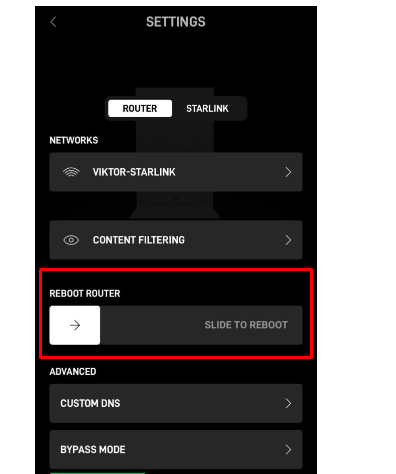
You can also Reboot the Router Via App

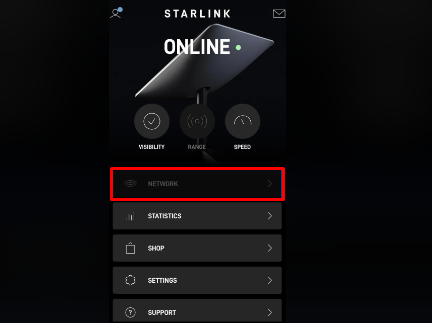
- Open the Starlink App and click on “Settings“
- Click on the “ROUTER” tab and swipe the arrow mark to the right on “SLIDE TO REBOOT“
- Again Click on “STARLINK” and repeat the previous step.
4. Verify WiFi Settings
Ensure that the WiFi is enabled and not in bypass mode. You can check this from the app or web page by going to settings and verifying the SSID and WiFi status.
To Access The Bypass Mode: Open “Starlink” app > “Settings” > “Bypass Mode” > Toggle “SLIDE BYPASS” off, if it is enabled
5. Uninstall and Reinstall The Star Link App
Uninstalling and reinstalling the app clears any cache or data that may be causing the issue.
If you are facing the issue of the Starlink app not showing connected devices, one solution that works for some users is to delete and reinstall the Starlink app. Here are the steps to follow:
To Uninstall the Starlink App:
- For Android: Hold the “Starlink App” > “Uninstall“> Restart the Phone.
- For iOS: Tab and Hold the “Starlink App” > Click on “– Symbol” to delete it > Restart the phone
To Reinstall the Starlink App:
- For Android: Open “Play Store” > Search “Starlink” > “Install“
- For iOS: Open “App Store” > Search “Starlink” > “Install“
6. Access the Starlink Account Page
If you find that your Starlink connection only resumes when you visit the account page and wait for 10-20 seconds, it suggests a potential software or communication issue that gets resolved temporarily by initiating a connection to the account page.
- Navigate to the “Starlink account page” on a device connected to your Starlink network.
- Allow the page to sit open for “10-20 seconds” without interacting with it.
- Check to see if the service is restored and the dish reconnects to the satellite network.
If this method works sporadically, it’s not a permanent solution but rather a temporary workaround.
