If you want to keep an eye on your device’s battery life with a quick glance, enabling the battery percentage display is a convenient feature.
On your device, you can easily see the exact battery percentage remaining, and light indicators which can help you better manage your device’s power usage throughout the day.
Also, it is essential to improve battery performance is essential to ensure long battery life.
In this blog, Lets see how to improve Apple Vision Pro Battery Life and how to maintain it properly.
How To Improve Apple Vision Pro Battery Life
When your device is fully charged, you can enjoy up to 2 hours of general use, encompassing tasks such as web browsing, writing, or other standard productivity activities.
Alternatively, if you’re planning to watch videos, a full charge will provide you with approximately 2.5 hours of playback time.

To improve the battery life of your Apple Vision Pro, consider the following tips:
1. Adjust The Brightness
Lower the display brightness to a comfortable level to save battery power.
To adjust display and text size settings for better visibility on your device, follow these steps:
- Press “Crown button” at the top of the head set and tap “Tab bar” at the left side of the screen.
- Select “App” from the side bar and double click on it.
- Open the “Settings” app on your device.
- Scroll down and tap on “Accessibility.”
- Under the Accessibility menu, select “Brightness.”
- Adjust the Brightness by dragging the slider using hand gesture.
Here, you can customize various visual options to suit your needs.
2. Close The Unused Apps
Ensure that apps not in use are closed to prevent them from running in the background and draining the battery.
To close an app on your device,
- You can tap just below the app, near the window bar.
- For a quick tip, try pinching and holding, then tap “Close [app]” to exit the app you’re currently using.
- If you want to close all other apps, simply tap “Hide others.”
- Additionally, you can use voice commands to close an app by looking at the app you wish to close and saying, “Siri, close this.”
3. Use The Low Power Mode
If available, enable a battery saver or low power mode to extend battery life.
Using Settings:
- Press “Crown button“ and Click on “App icon” form Tab bar at the left side of the screen.
- Open the “Settings” app.
- Tap on “Battery.”
- Toggle the “Low Power Mode” switch to turn it on or off.
Using Control Centre:
- Access the “Control Centre “by swiping down from the top-right corner of the screen (on an iPhone with Face ID) or swiping up from the bottom edge of the screen (on an iPhone with a Home button).
- Tap the “Low Power Mode” button to turn it on or off.
If the Low Power Mode button is not in Control Center:
- Go to the “Settings” app.
- Tap on “Control Center.”
- Find “Low Power Mode” and tap the Insert button (looks like a plus sign) next to it to add it to Control Center.
4. Update The Apple VisionOS Software
Keep your device’s software updated to the latest version, as updates often include battery performance improvements.
Automatic Update Steps:
- Press “Crown button” to enter into home view
- Open “Settings” on your Apple Vision Pro at the left side panel.
- Tap “General,” then “Software Update.“
- Select Automatic Updates.
- Turn on ‘Download visions Updates’ and ‘Install visions Updates’.
- Ensure your device is charging and connected to Wi-Fi to automatically update overnight, and await a notification before installation.
Manual Update Steps:
- Press “Crown Button” to go to Home view
- Click on “App icon ” from the Tab bar to go to app list
- Go to “Settings” on your Apple Vision Pro at the left side bar.
- Choose “General,” then tap on “Software Update.“
- Check if an update is available.
- If an update is available, start the update process.
- Remove the Apple Vision Pro while it updates and monitor the update progress on the front display.
5. Manage Background App Refresh
Disabling background app refresh will improve the battery life on Apple Vision pro.
To adjust the Background App Refresh settings on your device:
- Press “Crown button” at the top of the head set and tap “Tab bar” at the left side of the screen.
- Select “App” from the side bar and double click on it.
- Navigate to the “Settings” app.
- Select “General.”
- Tap on “Background App Refresh.”
From here, you can switch Background App Refresh on or off entirely, or you can manage the settings for each individual app according to your preferences.
6. Disconnecting the Battery for Storage
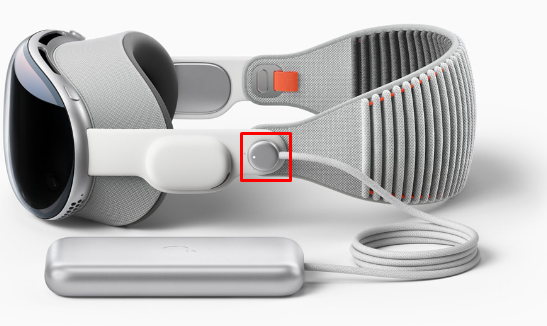
If you anticipate not using your Apple Vision Pro for a while, it is advisable to disconnect the battery to preserve its health.
To safely disconnect the battery from your Apple Vision Pro, follow these steps:
- Save Your Work: Before disconnecting the battery, ensure that you save all open documents or data to prevent any loss, as the device will power down once the battery is disconnected.
- Power Off the Device: It’s a good practice to turn off your Apple Vision Pro before disconnecting the battery, even though removing the battery will also power down the device.
- Disconnect the Power Cable: Gently turn the power cable counter clockwise until it unlatches and detaches from the device.
7. Maintaining Optimal Charge Levels
- Avoid leaving the battery completely drained or fully charged. The ideal charge level for storing the battery is between 40% to 60%.
- Regularly check the battery level if you’re storing it for a long time and recharge it if it drops below 10% or discharge it if it exceeds 60% if you are going to keep the headset idle for long duration.
- Charge your device with the original charger and avoid overcharging by unplugging once it reaches 100%. You can check the battery level by colour of light on Battery.
Understanding the Battery’s Light Indicator:
- Green light for several seconds: Battery is fully charged.
- Amber light for several seconds: Battery is partially charged but can power the Apple Vision Pro.
- Amber light pulsing slowly: Battery is too low to power the device. Charge for at least 10 minutes or until the light is steady amber.
To Check Battery Level in Visions
- Wear the Apple Vision Pro and open Control Center to see the battery level.
- To view the exact charge percentage,
- Go to “Settings” at the left bar
- Use Gaze control and use pinch gesture to Click on “Battery“
- Enable “Battery Percentage.”
- Now you can see the “Battery level” at top of the Apple Vision Pro screen.
8. Safe Charging Practices
- When charging the battery, do so away from heating objects to prevent overheating.
- Always use the official Apple Vision Pro battery and the charging accessories provided by Apple to avoid any compatibility or safety issues.
- Store your device in a cool, dry place to prevent exposure to extreme temperatures, which can degrade battery performance over time.
