If your Reolink camera is not recording to the SD card, it can be a significant concern, especially if you rely on your camera for security and surveillance purposes.
Reolink Camera is an important appliance that keeps your home safe however many people have reported that the Reolink camera isn’t recording to the SD Card.
In this article, we will be discussing the reasons why the Reolink camera not recording to SD Card and exactly how you can fix it with ease.
What are the Reasons for Reolink Camera Not Recording to SD Card?
When a Reolink camera is not recording to an SD card, several factors could be at play as we have discussed below.
1. SD Card Incompatible with Reolink Camera
Reolink cameras require an SD card that meets specific speed and capacity standards. If the SD card is not compatible with your Reolink camera—being either too slow, too small, or too large in capacity—it may not be recognized or function properly.
Always check the manufacturer’s specifications for compatible SD card types and sizes.
2. Incorrect SD Card Formatting
The file system format of the SD card is crucial for compatibility. Reolink cameras typically use the FAT32 file system.
If the SD card is formatted with a different file system, the camera may not be able to write data to it.
steps to confirm the SD card is formatted as FAT32 Or reformat if needed:
- Insert SD card into computer
- Open File Explorer
- Right click on SD card
- Select “Properties“
- Click the “General” tab
- Check “File system” field
- If it says “FAT32“, formatting is correct
- If not, select SD card and click “Format“
- Choose “FAT32” as file system
- Click “Start” to reformat as FAT32
- Allow reformatting to complete.
3. SD Card is Physically Damaged or Corrupt
Physical damage to the SD card, such as cracks or broken contacts, can prevent it from functioning.
Additionally, data corruption caused by improper ejection from a device or power failures during writing can render the card unusable.
4. Your SD Card is Full
If the SD card is full and the overwrite function is not enabled or not working correctly, the camera will stop recording because there’s no space left for new files.
steps to check if the SD card is full and how to fix it if the Reolink camera is not recording to the SD card:
- Remove the SD card from the camera
- Insert the SD card into a computer or laptop
- Open File Explorer and access the SD card
- Check the available storage space on the SD card
- If the SD card shows very little or no available space, it is full
- Backup any important footage you want to keep
- Use the “Format” option to completely format the SD card
- Choose “FAT32” as the file system
- Allow the formatting process to complete fully
- Insert the formatted SD card back into the Reolink camera
- In the Reolink app, enable the “Overwrite” option when the storage is full
- This will allow the camera to overwrite old footage when
5. Faulty SD Card Slot
The camera’s SD card slot may have a hardware issue, such as bent pins or debris, that prevents the SD card from making a proper connection.
The SD card slot might have dirt or dust in it due to which is it not functioning correctly.
6. Camera Firmware Issues in Reolink
Outdated or corrupted firmware on the Reolink camera can lead to a variety of problems, including recording failures.
You need to make sure that your firmware is always the latest version released by Reolink.
How to Fix Reolink Camera Not Recording to SD Card?
Check the SD card compatibility, verify the SD card insertion is done properly and format the SD card. Additionally, you can inspect the SD card for damage to fix the issue of Reolink camera not recording to SD card.
1. Check SD Card Compatibility With Reolink Camera
Ensure that the SD card you’re using is compatible with your Reolink camera. Reolink cameras typically support SD cards with a certain range of capacities and speed classes.
Refer to your camera’s specifications to confirm that the SD card meets the requirements.
2. Verify You Have Inserted the SD Card Properly
A common issue that can prevent recording is the SD card not being inserted correctly.
Power off your camera, remove the SD card, and re-insert it firmly to ensure a proper connection. Power the camera back on and check if the issue is resolved.
3. Inspect SD Card for Damage
Physical damage or corruption can render an SD card unusable. Check the SD card for any visible signs of damage.
If you have a card reader, try accessing the SD card on a computer to see if it’s recognized and can store data. If the card is damaged or corrupt, you’ll need to replace it.
4. Format the SD Card
Formatting the SD card can resolve issues related to file system errors or corruption.
You can format the SD card using the Reolink app or software. Ensure you backup any important data before formatting, as this process will erase all data on the card.
- Make sure your Reolink camera is powered on and connected to the network.
- Open the Reolink app on your smartphone or tablet.
- Tap on the camera you want to format the SD card for to enter the live view screen.
- Tap on the “gear” icon usually found in the top-right corner of the screen to access the camera settings.
- In the camera settings menu, look for “Storage” or a similar option that pertains to data management.
- Within the storage settings, you should find an option for accessing the SD card settings. Tap on it to proceed.
- Look for the “Format” button or option within the SD card settings. Tapping this will initiate the formatting process.
- You may receive a prompt warning you that formatting the SD card will erase all data on the card. Confirm that you want to proceed with the format.
- The app will show a progress bar or a status message indicating that the SD card is being formatted. Wait until this process is complete. Do not power off the camera or close the app during this time.
- Once the formatting is complete, you should receive a confirmation message. The SD card is now ready for use.
Note: It’s important to note that formatting the SD card will permanently delete all recordings and data stored on it, so ensure to back up any important footage before proceeding.
If you are using the Reolink Client on a PC, the steps will be similar, but you will be accessing the camera settings through the client software instead of the mobile app.
5. Check Recording Settings in Reolink
The camera may not record to the SD card if the recording settings are incorrect. Access the camera settings via the Reolink app or client software and verify that the recording is enabled.
Check the schedule to ensure that recording times are correctly set according to your needs.
steps to check the recording settings in Reolink:
- Open the Reolink app and go to the camera settings
- Tap on “Recording” or “Recording Schedule”
- Ensure the “Record Video” switch is turned on
- Check that the recording stream type is set to “Main Stream”
- Tap on the time bar to verify the recording schedule is set properly
- Make sure motion detection recording is enabled if needed
- For continuous recording, confirm the schedule is set for 24/7
- Tap on “Recording Target”
- Verify that the SD card is selected as the recording location
- Save any changes made to the recording settings
- Test the camera recording by triggering motion or waiting for scheduled recording time
- Check the playback in the Reolink app to confirm recording to SD
6. Update Reolink Camera Firmware
Outdated firmware can cause various issues, including recording problems. Check for firmware updates in the Reolink app or on the Reolink website.
- Access the NVR’s main menu by connecting a monitor and using a mouse or by logging into the NVR’s interface via the Reolink Client on your computer.
- Navigate to the ‘System‘ settings to find the ‘Information’ or ‘System Info’ section, which should display the current firmware version.
- Visit the Reolink official website and go to the ‘Support‘ or ‘Download Center‘ section.
- Find your NVR model and check for the latest firmware version available for download.
- Download the firmware file to your computer. It should be in a compressed format.
- Once downloaded, extract the firmware file, if compressed, to a folder on your computer. You should now have a .bin or .pak file, which is the actual firmware file.
- Format a USB flash drive to FAT32 (this is usually the default format for most USB drives).
- Copy the extracted firmware file to the root directory of the USB flash drive.
- Safely eject the USB drive from your computer.
- Insert the USB flash drive into the USB port of your Reolink NVR.
- Access the NVR’s main menu and navigate to the ‘System’ settings.
- Select ‘System Upgrade‘ or ‘Firmware Upgrade‘ from the menu.
- The NVR should detect the firmware file on the USB drive. Select the file and confirm that you want to upgrade the firmware.
- The NVR will begin the firmware update process. Do not unplug the USB drive or power off the NVR during this process, as it could cause the device to malfunction.
- Once the upgrade is complete, the NVR will usually reboot automatically.
- After rebooting, log back into the NVR and navigate to the ‘System Info’ section to confirm that the firmware version has been updated to the new version.
- After updating, ensure that all cameras are connected and functioning properly.
- Verify that settings have been maintained or reconfigure them as needed.
7. Reset Reolink Camera to Factory Settings
If other fixes have not resolved the issue, consider resetting the camera to its factory settings.
This can clear any software glitches that might be causing the recording problem. Note that this will erase all your settings, so you will need to set up your camera again after the reset.
- Find the reset button on your Reolink camera. It’s usually located on the body of the camera, and you may need a paper clip or a small pin to press it.
- Ensure that the camera is powered on before you attempt to reset it. The camera needs to be operational to complete the reset process.
- Use the paperclip or pin to press and hold the reset button. The time you need to hold the button can vary by model, but it is typically around 10 seconds.
- Listen for a beep or watch for the status LED to flash, indicating that the camera is resetting. The camera may reboot during this process.
- Once you hear the beep or see the LED flash, release the reset button. The camera will continue the resetting process.
8. Check for Power Issues
Intermittent power can disrupt the recording process. Ensure that your camera is receiving a stable power supply.
For battery-powered models, check the battery level and recharge if necessary.
9. Contact Support of Reolink

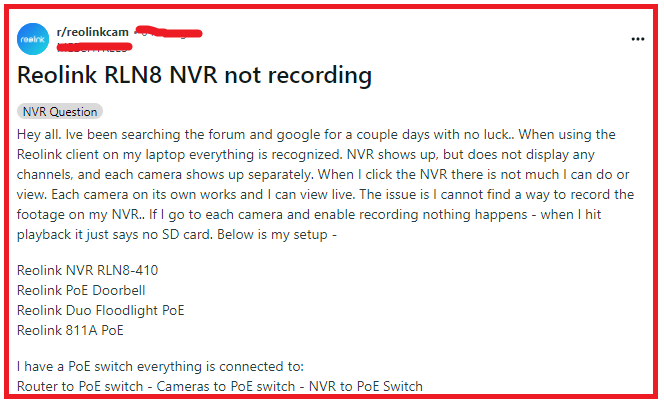
If you’ve tried all the above fixes and your Reolink camera is still not recording to the SD card, it’s time to reach out to Reolink support for further assistance.
They can provide additional troubleshooting steps and service options if there’s a hardware issue with your camera.