
The Meta Quest 3 is the latest iteration in the line of standalone virtual reality headsets, offering users a wireless VR experience with a vast library of games and applications.
For an even more wireless experience, you may want to use your Apple AirPods with your Meta Quest 3.
While the Meta Quest 3 doesn’t natively support iOS devices, it does have the capability to connect to Bluetooth audio devices.
Here’s how you can pair your AirPods with the Meta Quest 3.
How To Connect Airpods To Meta Quest 3

Preparing Your AirPods for Pairing
Before you can connect your AirPods to the Meta Quest 3, you need to ensure they are in pairing mode. Here’s what to do:
- Place the AirPods in Their Case: Make sure both AirPods are in the charging case and that the case has charged.
- Open the Lid: With the AirPods inside, open the lid of the charging case.
- Enter Pairing Mode: Press and hold the “Setup button” on the back of the case until the status light starts flashing white, indicating your AirPods are ready to pair.
Method 1: Using “App Library” Pairing Your AirPods with Meta Quest 3

Once your AirPods are in pairing mode, you can connect them to your Meta Quest 3 using the headset’s Bluetooth settings.
Step 1: Access the Settings Menu on Meta Quest 3
- Power on your Meta Quest 3 headset.
- Navigate to the “App Library” located at the bottom of the screen.
- Look for and select the “Settings gear” icon to open the Settings menu.
Step 2: Enable Bluetooth Pairing
- Within the Settings menu, click on “Devices.”
- Proceed to click on the “Bluetooth Settings” option.
- From there, select “Pair” to enable the headset’s Bluetooth discovery mode.
Step 3: Pair Your AirPods
- Click on the “+ Pair New Device” button to begin searching for Bluetooth devices close to your Meta Quest 3.
- Your AirPods should appear in the list of devices that are available for pairing. Select them to start the pairing process.
Step 4: Confirm the Pairing
- After selecting your AirPods, click “Pair” to finalize the connection.
- You should hear a tone or a voice prompt through the AirPods confirming that the pairing has been successful.
Method 2: Using “Quick Settings” Pairing Your AirPods with Meta Quest 3

Pairing your AirPods with your Oculus Quest 2 can give you a more private and immersive sound experience. Here’s how to do it:
Step 1: Access Quick Settings on Oculus Quest 2
- Turn on your Oculus Quest 2.
- Look for the “Quick Settings “menu, which is typically located in the left corner of the taskbar.
Step 2: Open the Main Settings Menu
- Select the “Settings icon” located at the top right corner of the menu.
- Click on the “Devices” option.
- From the menu that appears on the left-hand side, select “Bluetooth.“
Step 3: Begin Bluetooth Pairing
- On the Bluetooth screen, you’ll see a” Bluetooth Pairing” section. Click the “Pair button” to start the pairing process.
- Place your AirPods inside their charging case and leave the” lid open.“
- Press and hold the “setup button” on the back of the case until the status light starts flashing white, indicating that your AirPods are in pairing mode.
Step 4: Pair Your AirPods with Oculus Quest 3
- Back on your Oculus Quest 3, select “Pair New Device.“
- Your AirPods should appear in the list of available devices for pairing. Select them from this list.
Step 5: Confirm the Pairing
- Once you’ve selected the “pair button” in the Oculus Quest 3, Airpods will connect to them. You might receive a confirmation notification or hear a tone indicating that the pairing is successful.
Method 3: Using “Experimental Feature” Pairing Your AirPods with Meta Quest 3
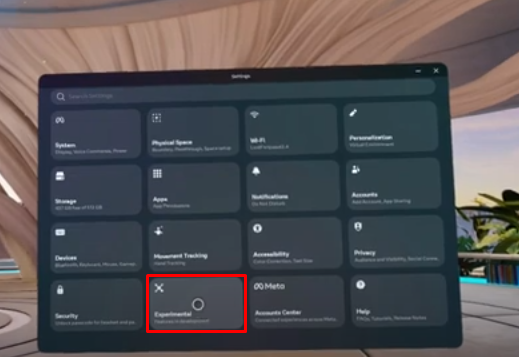
Step 1: Open the Settings menu
- Turn on your Meta Quest 3
- Click on “Quick Settings” near the Notification icon, look for the “Settings gear” icon at the top right corner and select it.
Step 2: Navigate to the ‘Experimental Features’ section:
- Find and select the ‘‘Experimental Features’‘ menu.
Step 3: Enable Bluetooth pairing:
- In the ‘‘Experimental Features’‘ menu, you should find an option to pair a new Bluetooth device. Enable this feature.
Step 4: Connect the AirPods
- Your Meta Quest 3 will now search for nearby Bluetooth devices. Find your AirPods on the list of available devices and select them to initiate the pairing process.
Step 5: Confirm the pairing
- Once selected, the Meta Quest 3 will connect to your AirPods. You should hear a confirmation tone or voice prompt indicating that the pairing is successful.
Post-Connection Checks
After connecting, you’ll want to ensure that the audio is transmitting correctly to your AirPods.
- Check the audio output: Start a game or app and confirm that the sound is coming through your AirPods and not the Quest 3’s built-in speakers.
- Adjust the volume: Use the volume control on your Meta Quest 3 to adjust the sound level to your preference.
- Test the microphone (if applicable): If you plan to use the AirPods’ microphone, test it in a social VR application or through a voice recording to ensure it’s working properly.