Experiencing incorrect lens strength displays on your Apple Vision Pro can be frustrating and hinder your device’s functionality.
Many users have reported having trouble with their lens in Apple Vision Pro, however, there is no need to worry anymore!
In this guide, we will walk you through troubleshooting steps to fix the issue “Apple Vision Pro Displays The Wrong Strength Of My Lenses”, ensuring your Vision Pro accurately reflects the strength of your lenses.
How To Fix Apple Vision Pro Displays The Wrong Strength Of Lenses?
You will have to check the fit of your Vision Pro, verify the lens insert and clean your device. Additionally, you can also update the Apple Vision Pro to fix the issue.
1. Check the Fit of Your Vision Pro
Before diving into software troubleshooting, make sure that your Apple Vision Pro fits well. A poor fit can lead to inaccurate readings of lens strength.
Apple provides guidance on how to ensure a proper fit. You can refer to the section below to see which should be a fit for your eyesight.
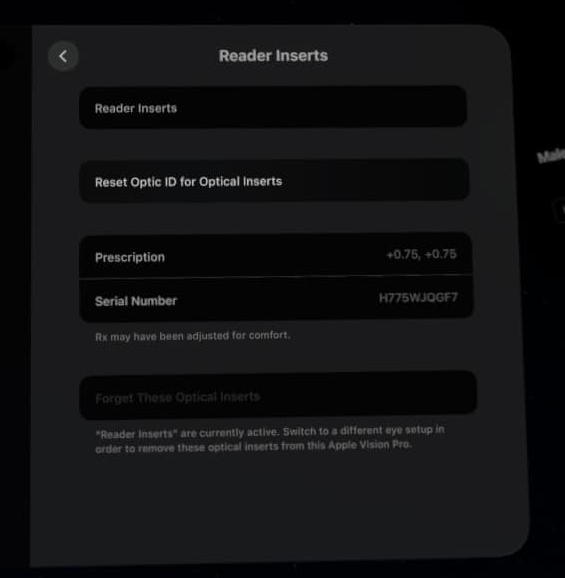
2. Verify the Lens Inserts
Ensure that the lens inserts you are using are compatible with the Apple Vision Pro. If you’re using a +2.00 strength Zeiss reading insert, for example, it should be recognized by the device when inserted correctly.
If the device is not recognizing the correct strength, it could be an issue with the lens inserts themselves or how they’re being read by the device.
3. Clean Your Device
Sometimes, a simple obstruction or dirt on the sensors can cause the Apple Vision Pro to misread the lens strength.
Make sure that the device has a clear view of the lenses. Clean the device and the lenses gently with a suitable cleaning solution and a microfiber cloth.
4. Calibrate Your Vision Pro
The Apple Vision Pro might require calibration to ensure it is reading the lens strength correctly. Follow the calibration process as detailed in the device settings or user manual.
This process might involve adjusting the device while wearing it to ensure it can accurately assess the lenses you have installed.
5. Update Your Apple Vision Pro Software
Software issues can sometimes cause devices to malfunction. Check if your Apple Vision Pro is running on the latest version of visionOS.
If not, update the device as newer software versions may contain fixes for issues like incorrect lens strength readings.
- Open Settings: On your Apple Vision Pro, start by navigating to the Settings app.
- Access General: Within Settings, find and select the General option.
- Go to Software Update: Tap on Software Update to check for available updates.
6. Contact Apple Support
If you’ve tried all the above steps and your Apple Vision Pro still displays the wrong strength of your lenses, it might be time to reach out for professional help.
You can visit Apple Support to talk to the personnel and find solutions.
What are the Things to Keep in Mind When Apple Vision Pro Displays The Wrong Strength Of My Lenses?
You might be having issues with your Apple Vision lenses because you have prescribed glasses.
Apple Vision Pro is not designed to be worn together with regular eyeglasses. However, if you rely on prescription glasses, including those for correcting astigmatism, you may have the option to order custom-made prescription ZEISS Optical Inserts tailored for use with the Vision Pro.
To acquire these ZEISS Optical Inserts for your Apple Vision Pro, you’ll need a clear and comprehensive prescription.
Ensure your prescription includes the following details:
- Separate specifications for distance correction and near correction, if necessary, which should be listed on the same prescription document. Eye care professionals refer to this as a full manifest refraction.
- A valid expiration date that has not yet passed.
- Your complete name, along with the license number and signature of the eye care professional who issued the prescription.
- The date of your eye exam or the date the prescription was issued.
With this information, you’ll be able to order the appropriate ZEISS Optical Inserts to enhance your experience with Apple Vision Pro.
Should you need reading glasses for close-up vision without the necessity for distance correction, ZEISS provides a solution with their Optical Inserts – Readers.
Tailored for individuals who typically use non-prescription readers, these inserts are conveniently labelled on both the packaging and the frames themselves.
This labelling indicates the range of reading lens powers to assist you in selecting the insert that aligns with your current reading glasses’ strength. ZEISS Optical Inserts – Readers are available in three distinct power ranges:
- From +0.75 to +1.25 diopters
- From +1.50 to +1.75 diopters
- From +2.00 to +2.75 diopters
Choosing the appropriate strength ensures your near-vision requirements are met comfortably with the use of ZEISS Optical Inserts in your Apple Vision Pro.
How To Use Accessibility Features in Apple Vision Pro?
Within the Apple Vision Pro Settings, you have access to a variety of options to tailor the device to your visual preferences:
- Eye Input Customization: Navigate to
Settings > Accessibility > Eye Inputto select your preferred eye for controlling the device. Options include using both eyes, or just the left or right eye individually, which is useful if you rely on one eye for device interaction. - Non-Eye-Tracking Display: To prevent the display from reacting to eye movements, which can cause a jumpy visual experience, go to
Settings > Accessibility > Display & Text Size > Ignore Eye Movements to Stabilize. This deactivates dynamic image optimization. - Enhanced Contrast for Focus: For increased contrast to better discern where you’re looking on the Apple Vision Pro, adjust the settings in
Settings > Accessibility > Display & Text Size > Increase Focus State. - Alternative Interaction Methods: If eye control isn’t suitable, the device can be operated using wrist, hand, or head movements. Set this up in
Settings > Accessibility > Interactionby selecting Pointer Control and choosing your preferred pointer method. - Zoom Feature: Amplify the size of content for better visibility by enabling the Zoom feature within
Settings > Accessibility > Zoom. Turn on Zoom to magnify the viewed items. - Voice Control: For hands-free operation, activate Voice Control by going to
Settings > Accessibility > Voice Controland initiating the setup process. This allows for voice commands to control the Apple Vision Pro.