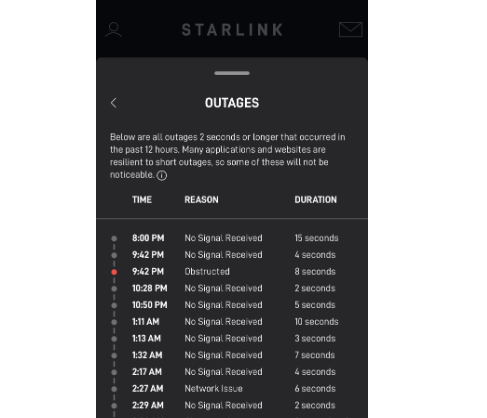
Experiencing connectivity issues with your Starlink service can be frustrating, especially if your dish is indicating “Offline: No Signal Received.”
This status means that your Starlink dish is not communicating with the network of satellites, effectively leaving you without internet access.
The reasons for this error can vary, including obstructions blocking the dish’s view of the sky, improper installation, or technical glitches within the system itself.
In this blog, let’s see the several troubleshooting steps you can take to attempt to resolve this issue and restore your connection to the vast space-based internet service that Starlink provides.
What Causes Starlink Offline No Signal Received Error?
The “Starlink Offline: No Signal Received” error can be attributed to several potential causes:
1. Obstructions
Physical barriers such as trees, buildings, or other structures can block the line of sight between your dish and the satellites. Or the dish may not be correctly aligned with the Starlink satellites, which is necessary for a stable connection.
2. Equipment Issues
Faulty cables, connectors, or a malfunctioning dish could prevent signal transmission. Inadequate power supply or power surges can also affect the dish’s operation.
3. Weather Conditions
Severe weather, such as heavy rain, snow, or extreme cloud cover, can interfere with the satellite signal.
4. Network Outages
Occasionally, Starlink may have network outages that can cause service disruptions.
How To Fix Starlink Offline No Signal Received
To fix disconnections with your Starlink internet service, first stow the dish, reseat the cables, and allow the system to remain offline for 20 minutes. Meanwhile remove the obstructions. Then power on the device again and check the connection.
Step 1: Stow the Dish
If you have the Starlink app, use it to stow the dish safely. This prepares the dish for any maintenance or troubleshooting without the risk of it moving unexpectedly. If you don’t have the app or prefer to do it manually, ensure the dish is not receiving power before you handle it.
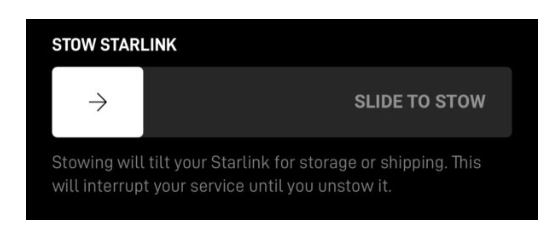
To Stow Dish Via App:
Open “Starlink App” > “Settings “> Swipe Arrow to the right on “SLIDE TO STOW” > “OK” to confirm the action.
To Stow Dish Manually:
- While the dish is plugged in and powered on, carefully remove it from its mounting base.
- Place the Starlink dish face down on a flat surface.
- Wait for about a minute, and you’ll notice the dish automatically tilts into the stow position.
- As soon as it reaches the stow position, unplug the dish by disconnecting the Starlink cable or the power cable from the router, ensuring it stays in that stowed state.
Step 2: Reseat the Cables
Disconnect and then carefully reconnect all cables associated with the Starlink dish and router.
This includes the power cables and any data cables connecting the dish to the router. Reseating the cables can resolve issues caused by loose or poor connections. Replace or try with alternate power outelet and cables if necessary.
Step 3: Leave the System Offline
After reseating the cables, do not power up the system immediately. Leave the entire system offline for about 20 minutes. This waiting period can help clear any residual charges and allows the system to reset any temporary configurations that might be causing the disconnections.
Step 4: Starlink Dish Realignment
Make sure your Starlink dish is properly aligned. Obstructions or misalignment can prevent it from connecting to the satellite network.
Finding a spot with a clear line of sight to the nearest satellite is crucial for a strong connection. After choosing the ideal location, install the equipment and turn on the power to allow the dish to automatically align itself.
Monitor the signal strength; if poor signal was the main issue, adjusting the dish’s position should establish a better connection.
Step 5: Power Up the System
After 20 minutes, reconnect the power to the Starlink dish and router. Toggle of Stow mode. Repeat Step 1 to toggle off the Stow via the app.
To restore service to a Starlink dish that has been stowed, Follow The steps:
- Carefully place the dish back into its mounting base.
- Reconnect the power by plugging in the Starlink cable or the router power cable.
- Give the dish some time—after several minutes, it will automatically begin searching for satellites.
- The dish will orient itself during this process, which may take a few more minutes to complete.
Once the dish has successfully oriented itself and locked on to the satellites, your Starlink service should be restored, and you can resume using the internet as normal.
Step 6: Avoid Bypass Mode Initially
Bypass mode allows you to use your router instead of the one provided by Starlink, but it can complicate troubleshooting.
Ensure that the system is functioning correctly in its standard configuration before you consider enabling bypass mode.
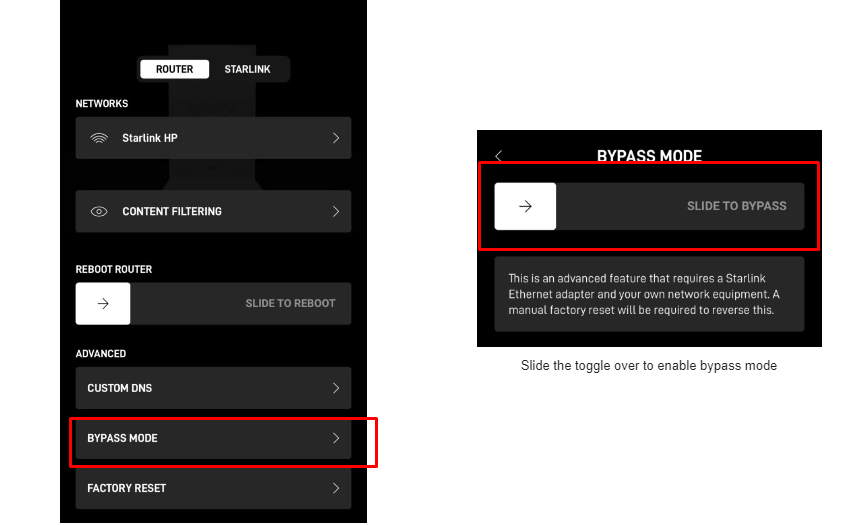
To Avoid Bypass Mode,
Open “Starlink App“> “Settings” > “Bypass Mode “> Scroll down and Toggle off “SLIDE TO BYPASS MODE” to the left if it is enabled.
Step 7: Test Your Connection
Once the system is powered back up, test your internet connection by using the Starlink app or by browsing the web on a connected device.
Monitor the stability of your connection for a period to confirm that the disconnection issue has been resolved.

If the problem seems to be fixed, continue to monitor your connection over the next few hours or days to ensure stability. If disconnects occur again, contact Starlink customer support for further assistance.