The Apple Vision Pro is a cutting-edge device that offers an immersive experience for users. However, there may be instances where you need to return or exchange the product.
The Apple Vision Pro, Apple’s innovative spatial computing device, comes with a customer-friendly return policy designed to provide peace of mind to purchasers.
Customers have the option to initiate a return within a specified period after receiving the product, ensuring a smooth and hassle-free process under certain conditions.
Apple has a clear and straightforward return policy in place to ensure customer satisfaction. In this blog lets see what are the Apple Vision Pro return policy and steps to return it.
Apple Vision Pro Return Eligibility

If you want to return Apple Vision Pro Support, the device can be returned within 10 days of the date of receipt.
To be eligible for a return, the Vision Pro must be in its original condition and accompanied by all the included accessories:
- Packaging- Apple Vision Pro Enclosure,
- Audio Straps, battery
- Power cable
- Original receipt (or gift receipt) must be presented when returning the product.
Apple Vision Pro Express Replacement Service
In the event that the Apple Vision Pro requires service, customers can utilize the Express Replacement Service, as outlined in the Apple Support page.
This service allows customers to receive a replacement product with clear instructions on returning the original device. It streamlines the process, ensuring minimal disruption to the user’s experience.
Preparing to Return Apple Vision Pro
Before returning the Apple Vision pro you need to
- Take data back up
- Reset the Modified settings
- Sign out of All Devices
- Reset the Apple Vision Pro device to its original state.
Step 1: Back Up Your Apple Vision Pro
To Back Up Data:
- Open the Settings app on your iPhone or iPad and tap on your name at the top.
- Tap “iCloud” and select “iCloud Backup.”
- Turn on iCloud Backup by switching the toggle.
- To manually back up your device right away, tap “Back Up Now.”
To view your iCloud backups,
- Return to the” Settings app“, tap your name, then “iCloud,”
- Go to “Manage Account Storage,” and finally “Backups.”
- Tap “Delete Backup.” Confirm by tapping “Turn Off & Delete.”
Step 2: Returning Settings to Default
The Vision Pro also offers the capability to return settings to their defaults, as detailed in the Apple Vision Pro Guide. This feature allows users to reset specific settings such as network, location, and privacy settings, providing an option to troubleshoot issues before considering a return or service.
To reset your Apple Vision Pro settings to their defaults without erasing your content, follow these steps:
- Press “Crown button” at the top of the headset,
- Click on “Settings” from the tab bar
- Tap on “General“.
- Select “Transfer or Reset Apple Vision Pro.“
- Tap “Reset.“
- Here you will find several options. Choose the one that fits your needs:
- Reset All Settings: This will reset all your device’s settings to their defaults without erasing content.
- Reset Network Settings: This removes all network settings, returning them to factory defaults, and renames your device back to “Apple Vision Pro.”
- Reset Keyboard Dictionary: This erases all the custom words you have added to the dictionary.
- Reset Location & Privacy: This returns your location services and privacy settings back to their original settings.
- Reset Surroundings Data: This removes any saved data about your surroundings.
Step 3: Sign Out From All Devices
To find where you’re signed in with your Apple ID using different devices:
On iPhone, iPad, or Apple Watch:
- Tap “Settings” > “[your name]“.
- Scroll down to see the list of devices signed in with your Apple ID.
- Tap any device name to view its details like model, serial number, and OS version.
- Tap on “Remove Device“
On a Mac:
- Choose “Apple menu” > “System Settings “(or System Preferences for macOS Monterey or earlier).
- Click your “name (or Apple ID)“.
- Click any device name to view its details.
- Tap on “Remove Device“
On a PC:
- Open “iCloud” for Windows.
- Click “Account Details“, then click “Manage Apple ID.“
- Click any device name to view its details.
- Tap on “Remove Device“
Using the web:
- Sign in to “appleid.apple.com” and select “Devices.“
- If prompted, click “View Details” and answer your security questions.
- Click any device name to view its details.
- Tap on “Remove Device“
To permanently remove a device:
- Sign out of “iCloud, iTunes & App Stores“, “iMessage,“” FaceTime, “and “Game Cente“r on the device.
To reset your Apple Vision Pro to factory settings and prepare it for a new owner, follow these simple steps:
Step 4: Remove Activation Lock
- Go to “Settings“, tap your name at the top, scroll down to the bottom,
- Tap ‘‘Sign Out’‘. You’ll need to enter your Apple ID password and then tap ‘‘Turn Off’‘.
Step 5: Erase Your Apple Vision Pro
Complete the Reset:
- After transferring your data (if needed), go back to ‘‘Settings’‘ > ‘‘General’‘ > ‘‘Transfer or Reset This Apple Vision Pro’‘.
- Choose ‘‘Erase All Content and Settings’‘.
- This will remove all your personal information and reset the device to its original factory settings.
Remember to back up any important data before erasing your Apple Vision Pro, as this process is irreversible and will delete all your personal information from the device.
Step 6: Packing Your Apple Vision Pro Enclosure
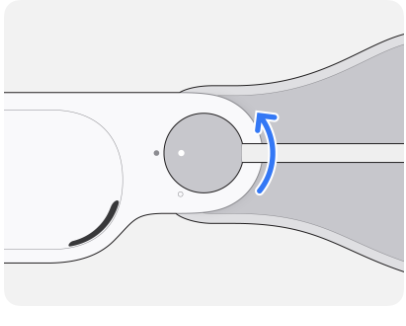
- Gently turn the power cable counter clockwise to remove it from the Audio Strap.
- Carefully take off the Head Band from your Apple Vision Pro and store it in a secure place.
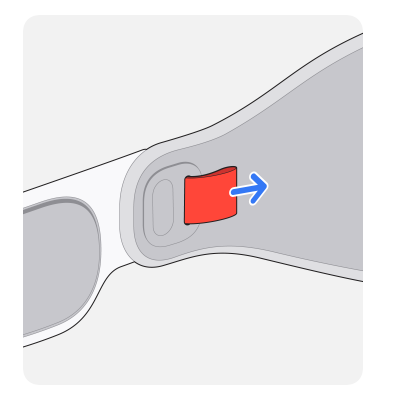
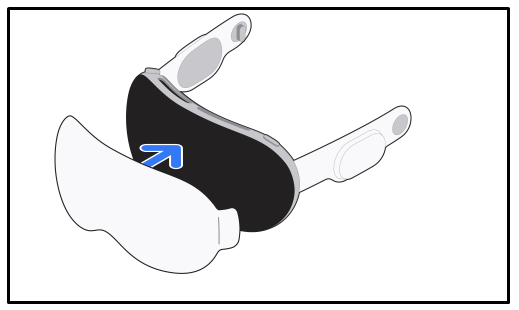
- Pull off the Light Seal and Light Seal Cushion from the Enclosure and keep them in a safe location.
- If you have ZEISS Optical Inserts, take them out and place them aside.
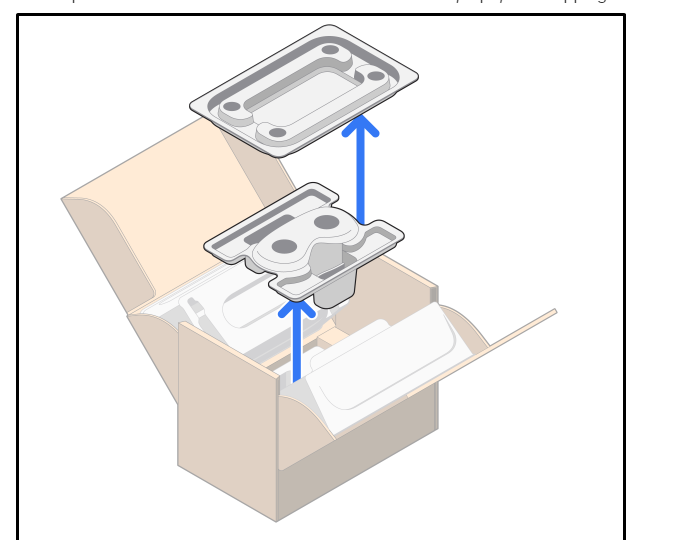
- Open the box you received from Apple and take out the molded inserts, tape, and shipping label. Set these aside for the moment.
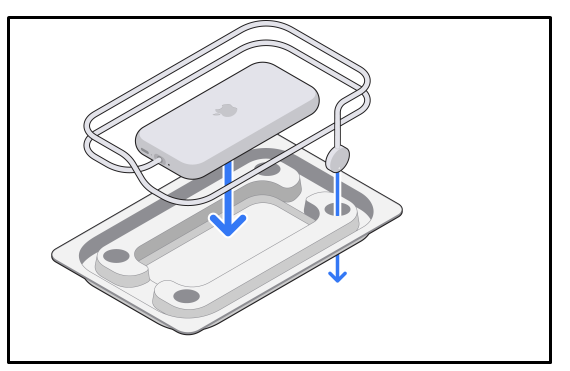
- Find the protective film at the bottom of the box, remove its backing, and stick it to the cover glass of your Enclosure.
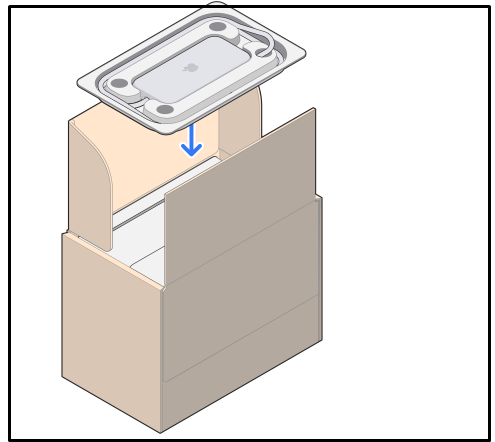
- Lay the Enclosure cover glass-side down into the tray provided.
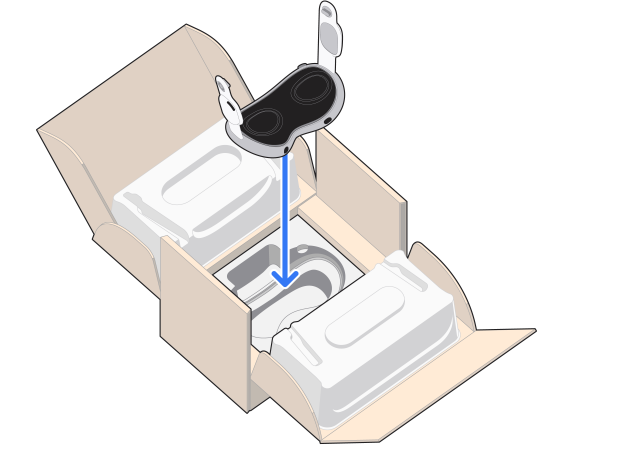
- Set the secondary molded tray on top of the Enclosure.
- Fold the box sides up so that the molded trays keep the Audio Straps upright.

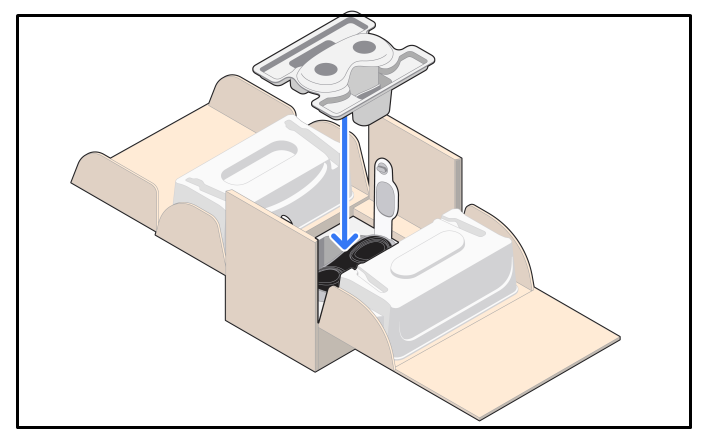
- Put the battery into its designated tray and wrap the power cable around it.
- Insert the battery connector into one of the tray’s holes.
- Place the battery tray on top of the inner cartons.
- Securely close the box by sealing it with tape and send it to Apple. If there’s a battery sticker on the exterior of the box, ensure it remains visible and unobstructed.

- Please note that Apple cannot be held accountable for any damage that occurs during shipping.
Step 7: Ship Your Apple Vision Pro
Send your Apple Vision Pro Enclosure back to Apple by following these steps:
- Check the return shipping label for the name of the courier service.
- Go to the courier’s official website to either schedule a pickup at your location or to locate a nearby drop-off point.
- When you hand over the package to the courier, make sure to obtain a receipt as proof of shipment.
- Avoid leaving your package in a drop box; always hand it directly to a courier representative to ensure safe delivery.